Ticket Setup
With FarmPass you can make up just about any ticket you could imagine. Under this section we go over how to make regular and scheduled tickets as well as season passes. We have many great options with our tickets from bundles to groups discounts. This section contains our frequently asked questions involving our tickets.
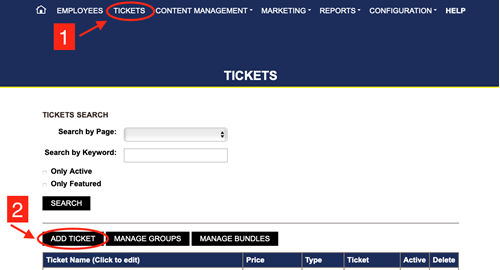
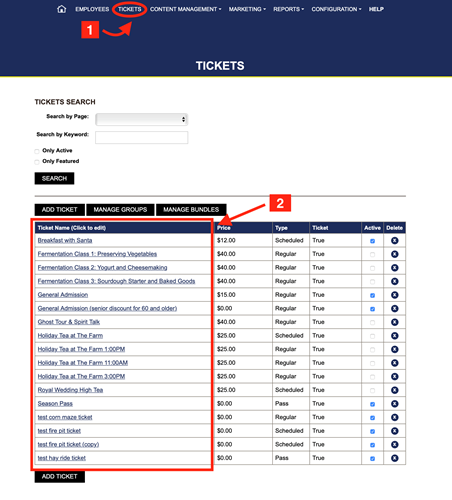
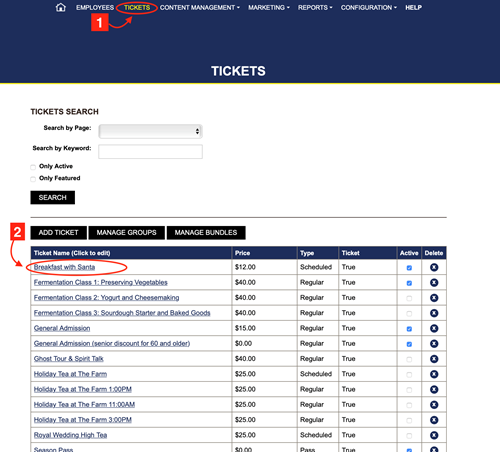
1. Go to your Dashboard, click on Tickets.
2. Click add ticket.
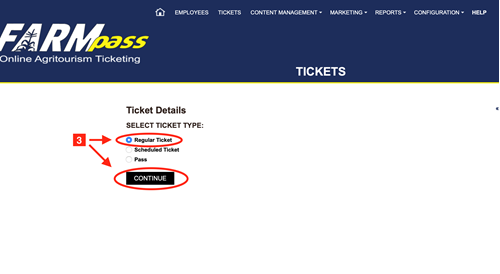
3. Choose regular ticket from the options. Click continue.
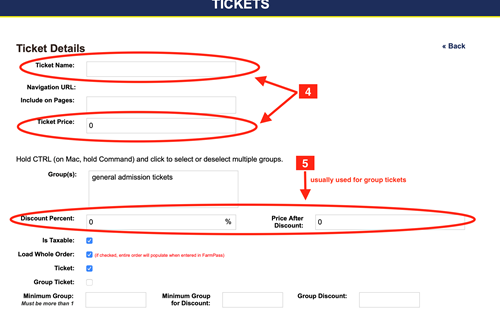
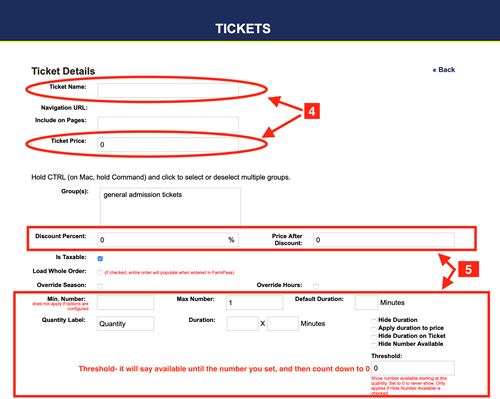
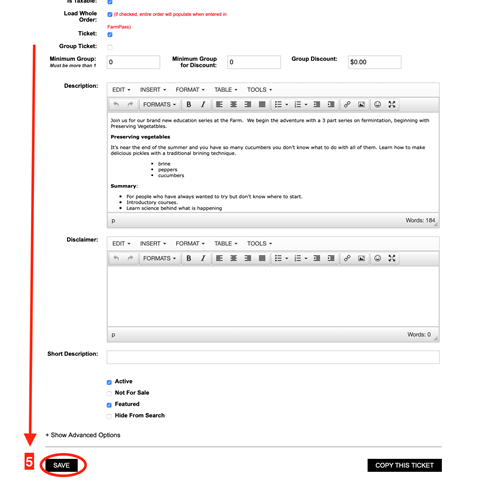
4. Enter the name and the price of the ticket.
5. Fill out the rest of the information. (These next choices are usually used for group tickets)
i. Discount percent, this is usually left blank.
ii. Price after percent, min group, min group for discount, group discount.
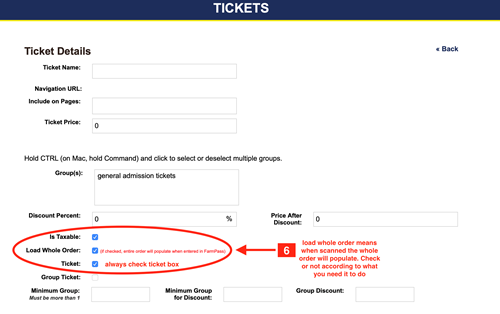
6. Select according to what you need.
i. Taxable
ii. Load whole order ticket. This means that the entire purchase is under one ticket , but when scanned it will break down to the single tickets purchased under that order. If left unchecked when redeemed it will show as one ticket.
iii. Always make sure the ticket box is checked.
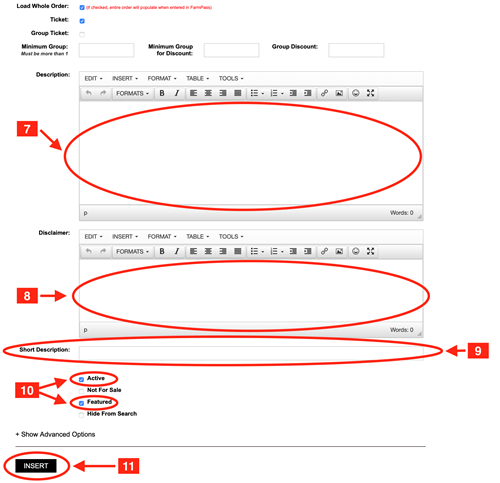
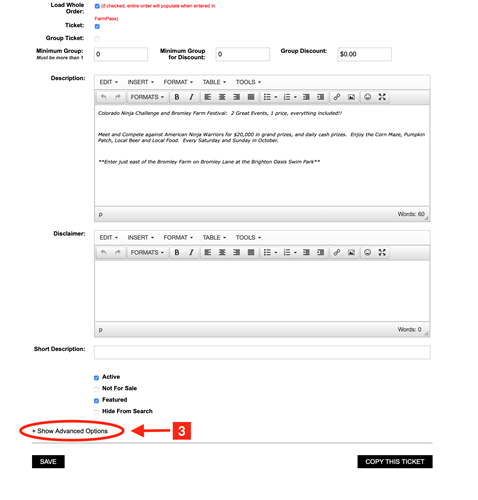
7. Write a description of the ticket, and what is included. This will be seen after clicking on the ticket from the home page.
8. Fill out the disclaimer, this can be left blank, but there will not be a pop up at check out.
9. Fill out the short description. This will be shown on the home page under the ticket.
10. Check active, this will make the ticket live. If left unchecked then it will not be available to purchase.
i. Check featured. If left unchecked the ticket will not appear on the homepage.
11. Click Insert!
Will also have a great clip that will walk you through the whole process!
1. Go to your Dashboard and click on Tickets.
2. Click add ticket.
3. Choose scheduled ticket then click continue.

4. Enter the ticket name and price.
5. Fill out the following according to what you need:
i. Discount percent, this is usually left blank.
ii. After price percent
iii. Max number, this is the max number of tickets you want sold per time slot.
iv. Default durations, this is the amount of minutes you want your schedule to run by. For example you would put 15 if you plan on running 15 minute hayrides.
v. Quantity label, this is where you label whatever it is you are scheduling. Its default is always quantity unless you change it.
vi. Duration x mins- in most cases you will put 1 x the time of your default time slot. There are many advanced user options you can use with this setting. If you need more information on duration options refer to our advance setting help page.
6. Check taxable and load whole order if appliciable to you. Load whole order means that if someone is buying more than one ticket under the same order, when scanned it will show all of the tickets under that order number. They can then be redeemed at the same time individually. If left unchecked it will load as one ticket for the whole order when scanned.
7. Check all that apply to you:
i. Override season, you check this if the ticket is outside of your set season schedule.
ii. Override hours, check this if the ticket will be offered outside your regular hours.
iii. Hide duration, this will show the time to start on the ticket but not the length.
iv. Apply duration to price, if checked and they buy multiple time slots they will be charged for each time slot. If unchecked they will only be charged one time slot.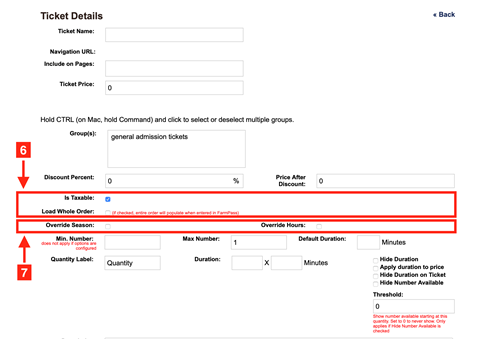
8. Enter the full description of your ticket, this will appear after they click on the home page.
9. Fill out the disclaimer. If you leave this blank the pop up will not appear at checkout.
10. Write a short description of the ticket. This will show on the home page for the ticket description.
11. Check active, this makes the ticket go live. You can go back and uncheck this box if you want to make the ticket unavailable for purchase .
i. Check featured. This will show the ticket on the home page. If this is unchecked then it will not appear on the home page.
12. Click insert!

We also have a great clip that will walk you through step by step!
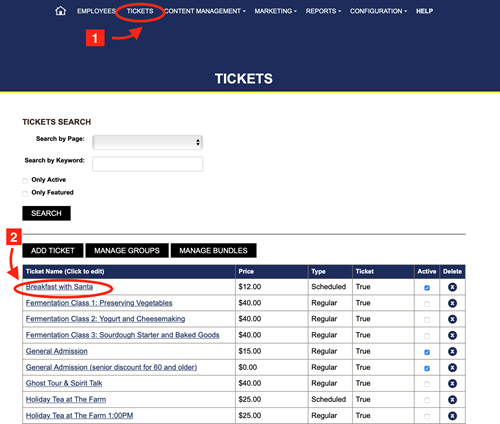
1- Go to your Dashboard and click Tickets.
2- Choose and click the ticket that you need.
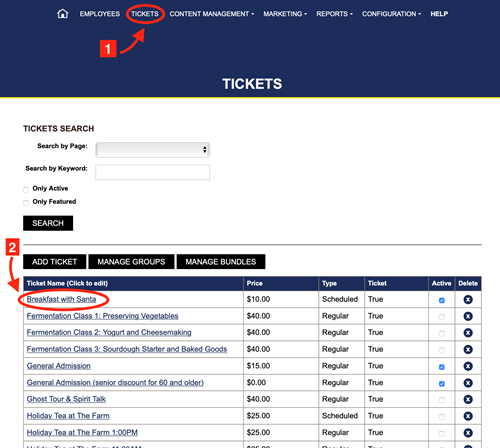
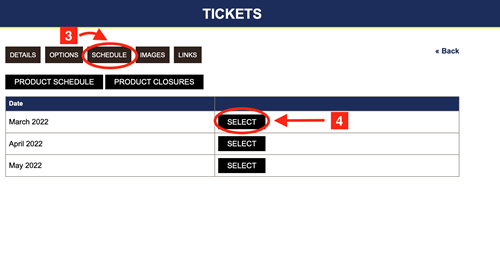
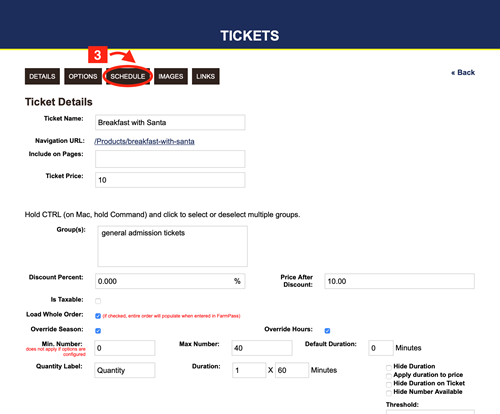
3- Click the schedule tab.
4- Select the month you want to schedule.
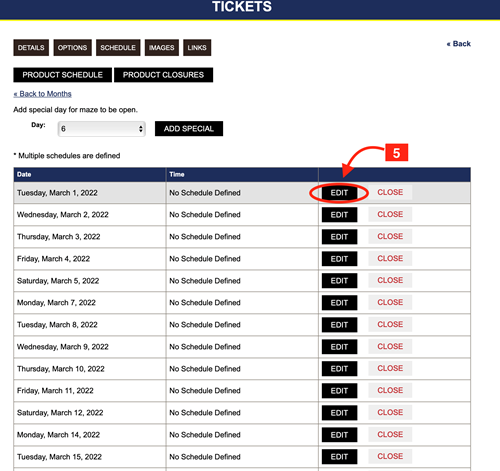
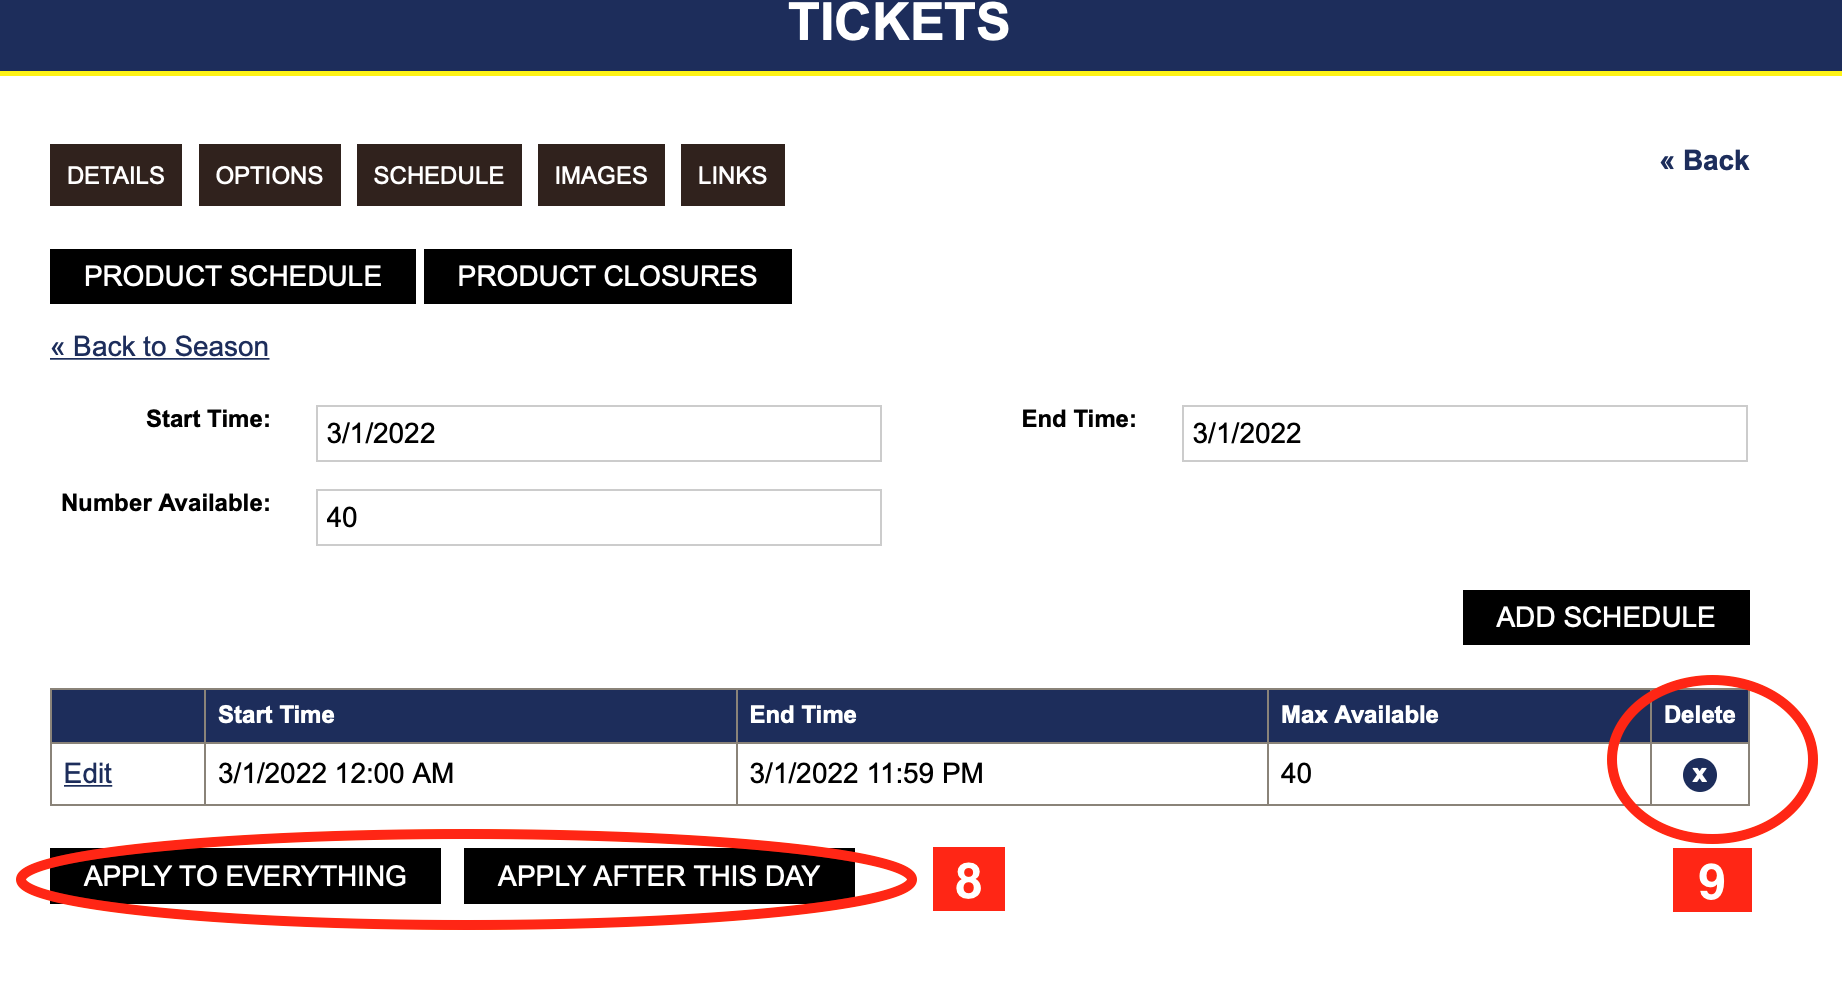
5- Click edit on the day that you want to add a schedule.
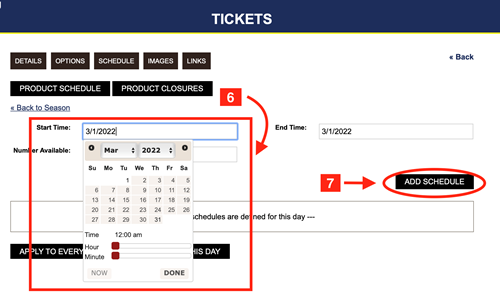
6- Set the date and time for the schedule.
7- Click add to schedule.
8- If you want that schedule set just for that specific day you are done.
i. Click apply to everything if you want to use this schedule for the whole calendar for that ticket.
ii. Click apply after this day if you want to change the schedule starting after the date.
9. If you want to delete a schedule click delete.

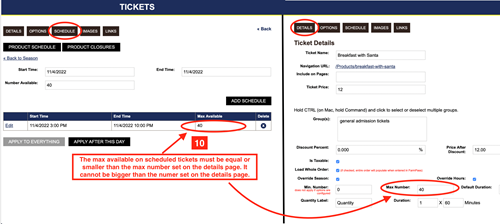
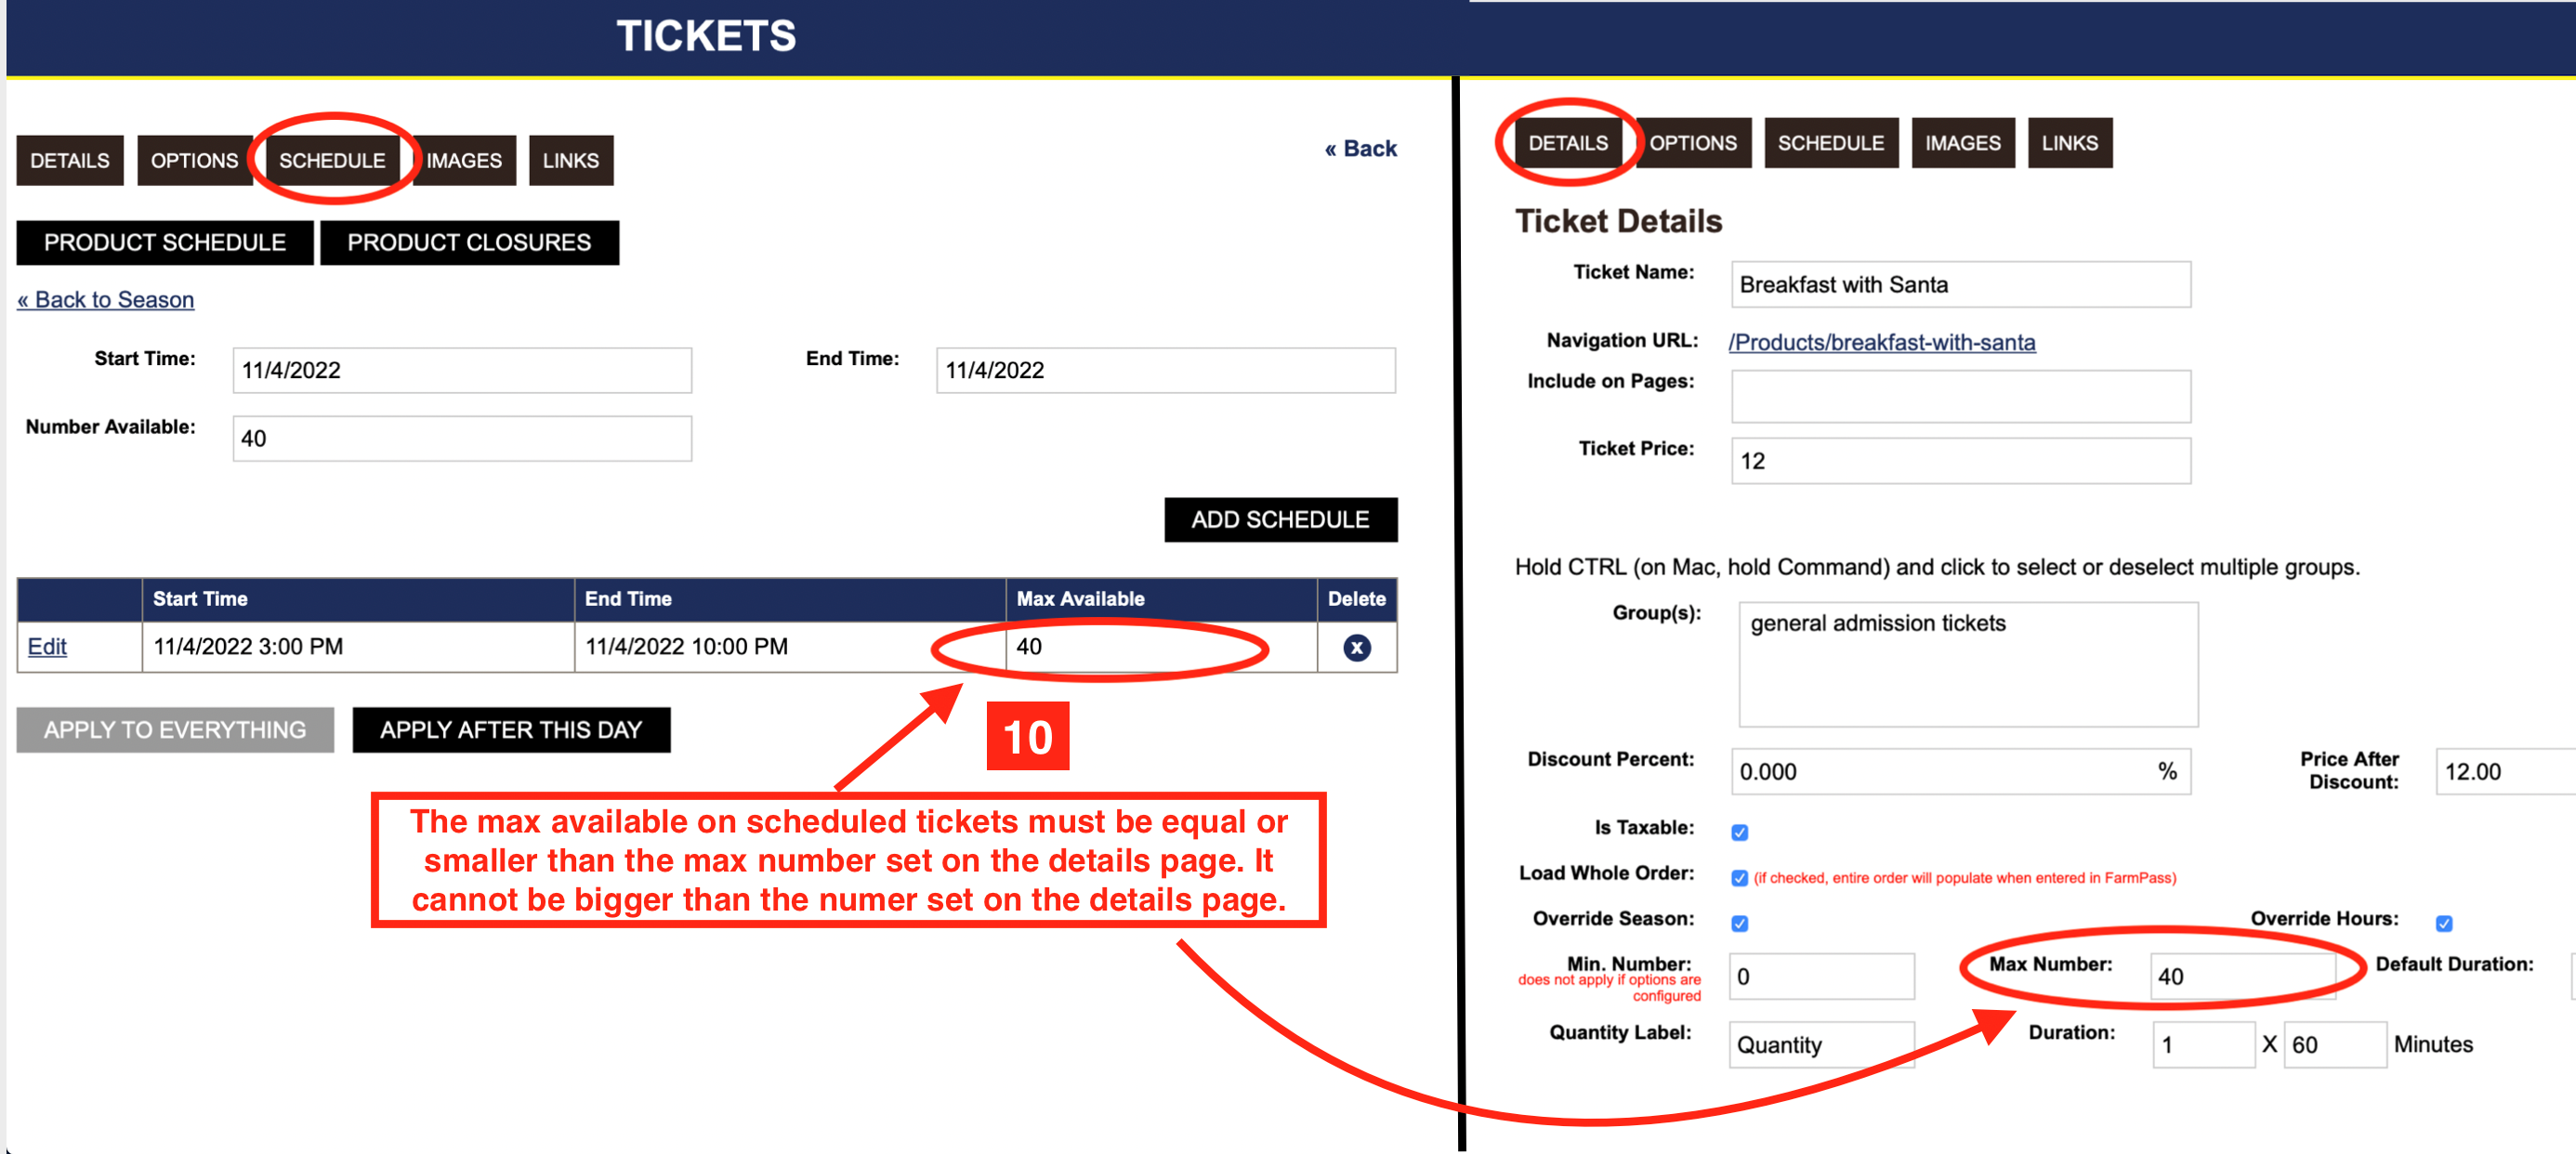
10. The max available must be the same or smaller than the max set on the details tab.
When creating tickets with in your season and hours it will populate the schedule out for you where you can edit and change certain dates instead of going in one by one. Just click edit on whichever day you are looking to change. You can also close a day by hitting the close button. It will then take the day off the schedule.
We also have a clip that walks you through it, its under ticket schedule out of season section. Check it out if you have more questions.
1. Go to your Dashboard click on Tickets.
2. Choose and click the ticket you want to set a schedule for.
3. Click the Schedule tab.
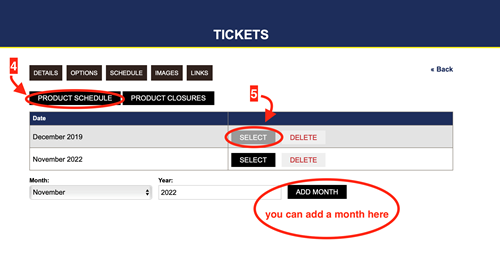
4 Click Product Schedule
5. Select the month you want to schedule. It won't show out of season or hours you will have to add those.
6. Choose the day you want to set the schedule.
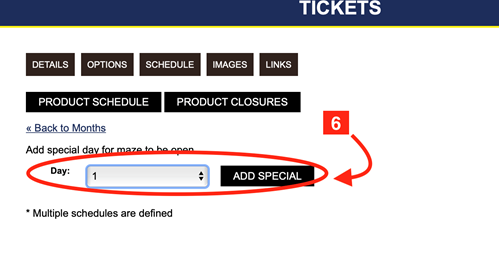
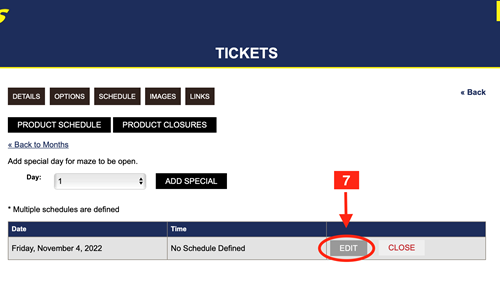
7. Click edit next to the day you want to schedule.
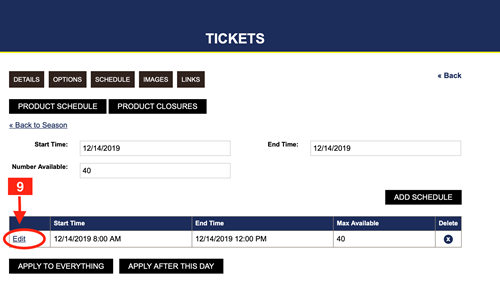
8. Set the time and hours by clicking on the box and it will give you a calendar and a slider for the time.
i. Click add to schedule when you have your day and time.

9. You can also edit a schedule that is already set by clicking edit on the days that are shown.
10. Set the max tickets amount. This amount need to be equal or smaller than the max set on the details tab. It cannot be more than the max already set.
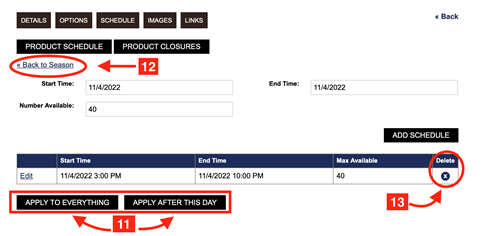
11. Click apply to everything if you want this schedule to be set for all the days of the ticket.
i. You can also choose to apply after this date, this will change the schedule for all future days. Apply to everything will change the schedule for past and present. If you want just that day's schedule to change don't hit either button.
12. Once you have hit add schedule it is added in the system so just hit return to season to continue making changes, and you work will be saved.
13. If you want to delete a schedule that you have created, click the delete button.
We also have a clip that will walk you through the the while process.
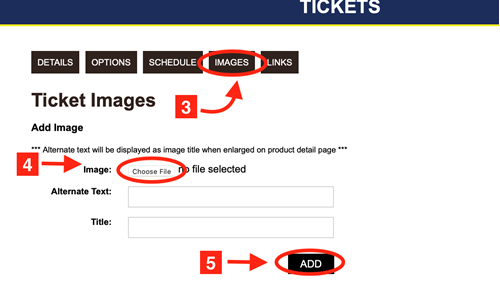
1- Go to your Dashboard and click Tickets
2-Choose the ticket you want to add an image to.
3- Click on the Image tab.
4. Choose the file you want.
5. Click add.
We also have a clip that will walk you through it.
A ticket pass or a season pass, is a great tool that customers can buy and use for your whole season. It has many features and settings so you can tailor the ticket to your needs. This pass can be used as an unlimited pass or you can set it to be used for a set number of times. When purchasing it will ask for a picture, the customer will upload a picture that will be used on their ticket as well as the redeem screen. You can check the picture with the person trying to redeem.
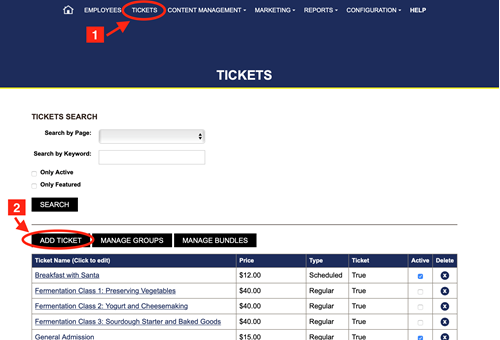
1. Go to your Dashboard click on Tickets.
2. Click add ticket.
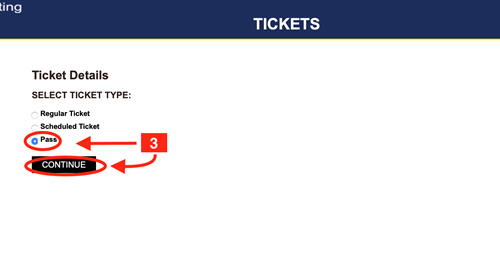
3- Choose Pass from the options, click continue.
4.Enter the ticket name and price.

5. Choose what applies
i. discount percent - this is usually left black
ii. Price after discount.
iii. Taxable
iv. Load whole order- if checked, when a customer orders more than one ticket under the same order this will load the whole order with the ticket is redeemed. All of the tickets will load and you can then redeem all the tickets under the same order. If unchecked then the ticket will pull up as one ticket, even if there is more than one ticket bought in that order.
6. Fill in the start and end date for the ticket pass. This is for how long this ticket will be valid. The end date will be the expiration date.
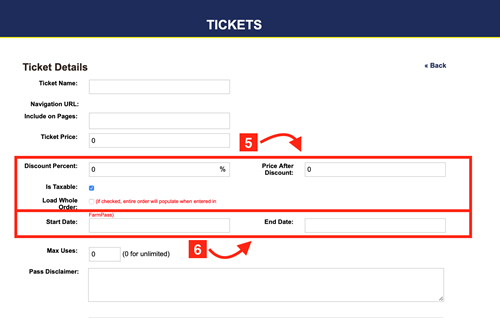
7. Max uses- 0 is the default which means it will be an unlimited pass. If you want the pass to have limited use this is where you put the amount of uses that are good for this pass. If you fill in 5, it will give the customer 5 uses before the pass is no longer valid.
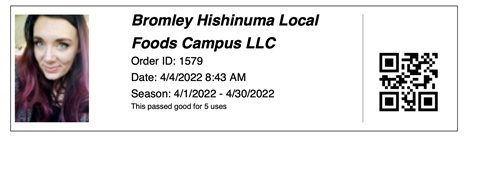
8. Fill out the pass disclaimer. This information will show up on the ticket that the customer receives. This is a good place to put the amount of uses, as well as any other rules or guidelines to using the pass. For example if you do not accept the pass from anyone besides the picture associated with the pass.

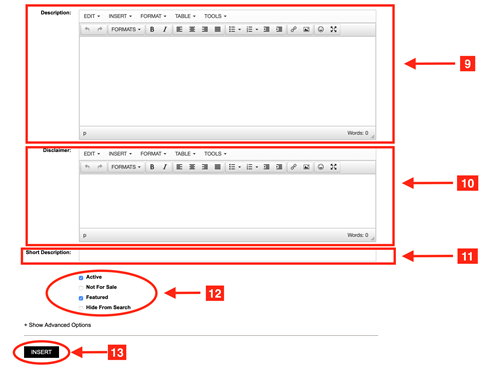
9. Write the description of the pass. How it can be used and any restrictions that may apply. Also it is important here to list here whether it is an unlimited pass or a limited use pass.
10. Fill out the disclaimer. This will pop up at the end right at checkout. This can be any disclaimer you want them to see for your farm. If left black there will be no pop up at checkout.
11. Fill out the short description. This is what will appear on the home page by the ticket. This is also a good place to say either unlimited or limited pass for how ever many uses. .
12. Check the active, this will enable the ticket to go live. if left unchecked then the ticket will not be available for purchase.
i. Check the feature box. This will put the ticket on the home page. If left unchecked then the ticket will not appear on the home page.
13. Click insert.
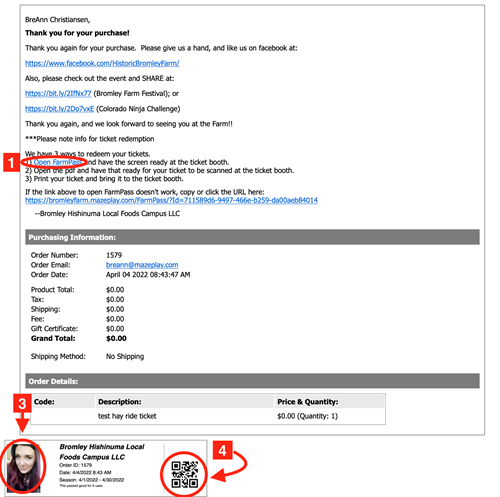
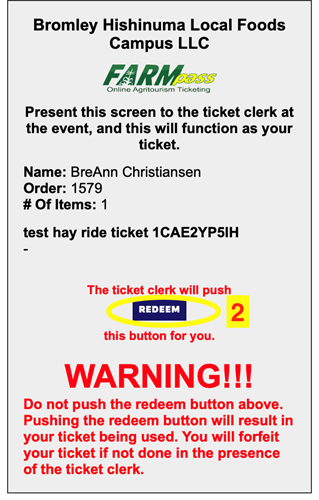
14. Below is an example of what a ticket pass looks like when a customer purchases it. It will be emailed to them with instructions.
We also have a great clip that can walk you through the whole process!
Ticket questions are a great way to add choices, preferences or needs to your individual tickets. The ticket question will show up at purchase and the selections with show on the tickets and in redemption. Ticket questions are under advanced settings in the ticketing options. The steps below will walk you through how to set up your questions. Customers can choose to not answer the questions and no selections will be shown on the ticket.
1. Go to your dashboard and click Tickets.
2. Click on the ticket that needs the questions.
3. Scroll down until you reach advance settings, click on it to expand your choices.
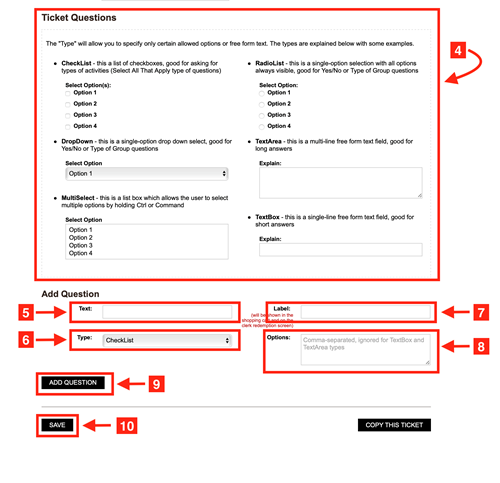
4. Scroll down to Ticket Questions. There is a box that explains the different options and what they mean or how they are used.
5. Text- this is where you write the question.
6. Type -choose the way you want you options to be shown. Examples and explainations are shown in the box above. ( see step 3)
7. Fill out the Label. This will show in the cart and on the redemption screen.
8. Write out the options you are offering, separating them with commas.
9. If you would like to add multiple questions click add question and fill out the new question options.
10. When you are done with your questions click Save. Do not forget to click save! Nothing will change until you hit the save button.
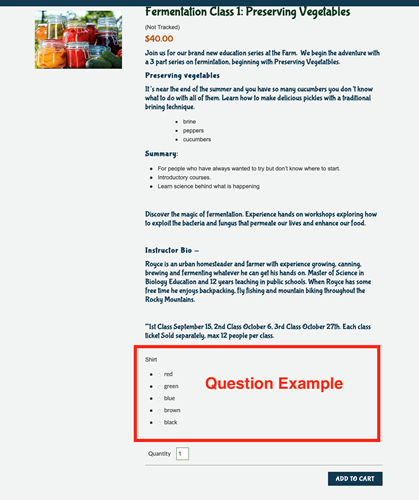
11. Below is an example of a question from the customers screen. This is what it can look like. It will look slightly different depending on the different options that you pick. This example is using Radio type to display the choices.

Still have questions? The clip below will walk you through the whole process.
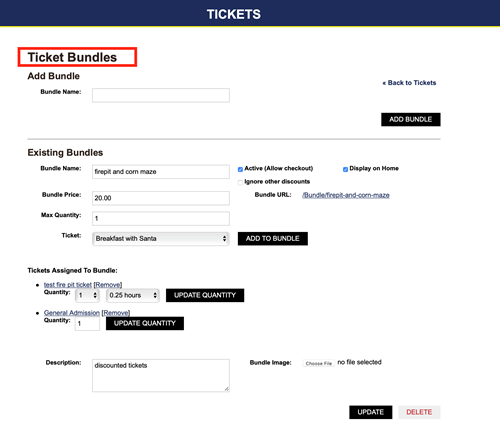
Ticket Bundle
A ticket bundle allows you to combine different tickets to be included in one price. When you click on the ticket bundle it will show all that's included in that ticket. This allows you to combine different tickets under the same ticket. You can add different bundles as well as edit or delete them as you need them.
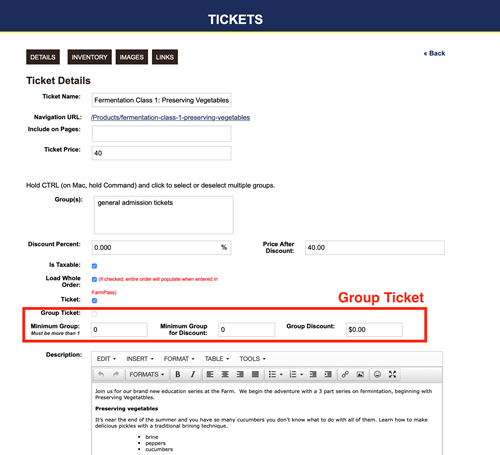
Group Ticket
A group ticket allows you to set a minimum number that is required before they can buy the ticket. From there you can set a group discount price that they can receive for buying a set amount of tickets. You can set a dollar amount off per ticket once the minimum has been reached. Once they purchase the minimum that you have set per ticket the price will automatically adjust.
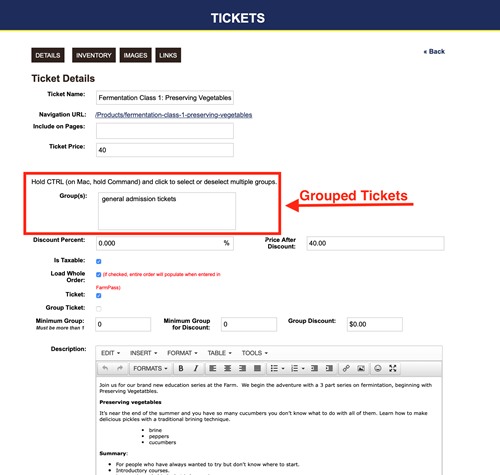
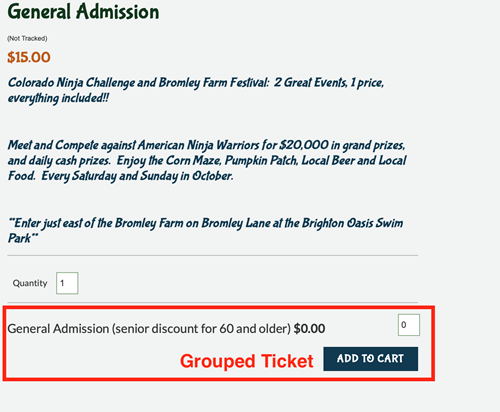
Grouped Tickets
Grouped tickets is a feature that allows you to have tickets grouped together so that when they are purchasing a ticket they have options or groups right on the screen that allows them to add other tickets to their cart from the screen they are on. For example for a general admission ticket you could group a child admission ticket with it. When buying the general admission ticket, an option to al so buy a child admission with that ticket will be available. This makes it so they can add tickets all from the same screen and not have to search it out from the home page.
A ticket bundle allows you to combine different tickets to be included in one price.
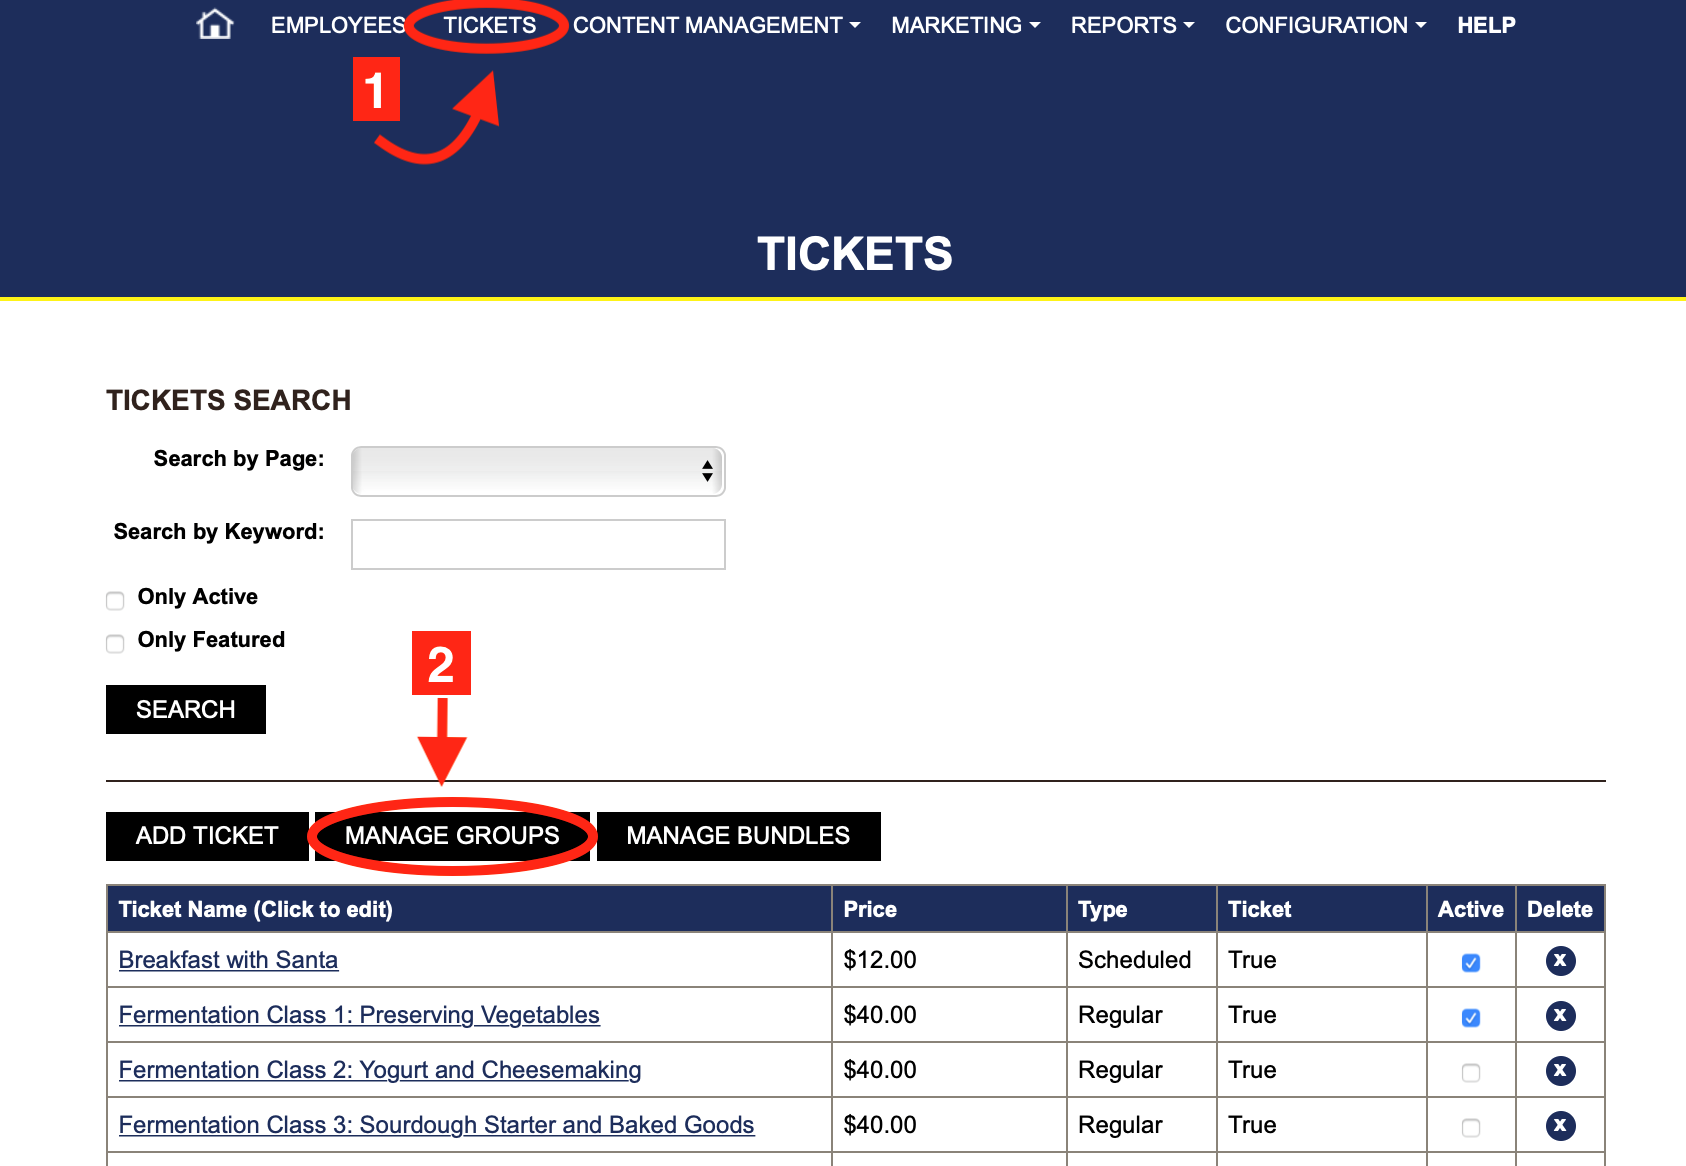
1. Go to your Dashboard and click on Tickets.
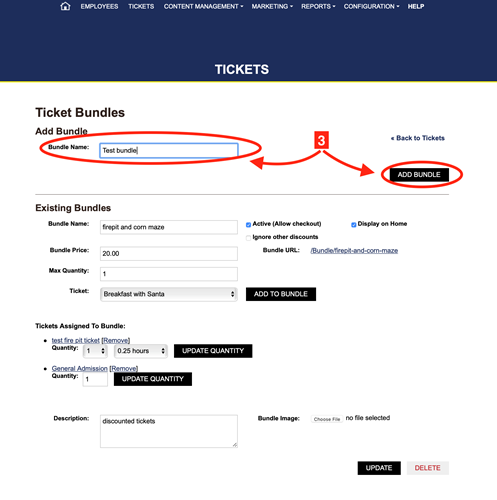
2. Click on Manage Bundles.

3. Name your bundle, and click add bundle.
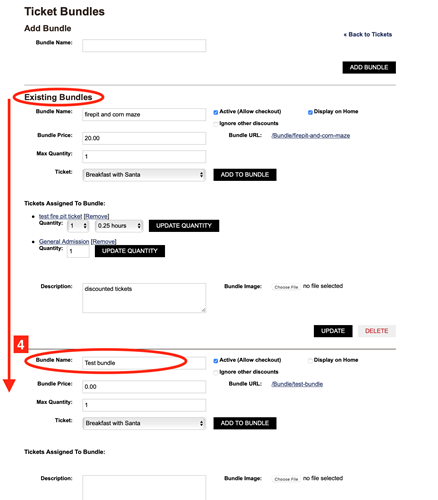
4. Scroll existing bundles until you see the bundle that you just created.

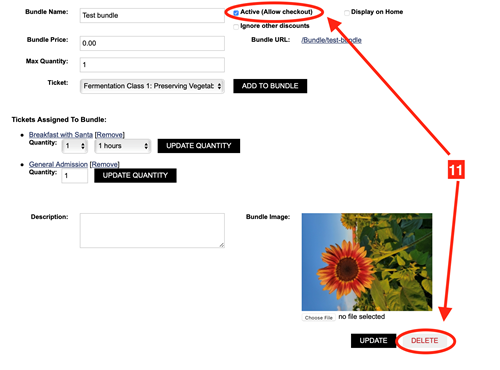
5. Fill out according to your needs.
i. Bundle Price- What you want to charge for this bundle.
ii. Max Quantity- The max number of tickets they can buy under one order.
iii. Active- If checked the bundle will be active and available for purchase.
iv. Display on home- If checked the bundle will appear on the home page.
v. Ignore other discounts- if checked, it will ignore any other discounts that may be running on tickets that you are using in this bundle.


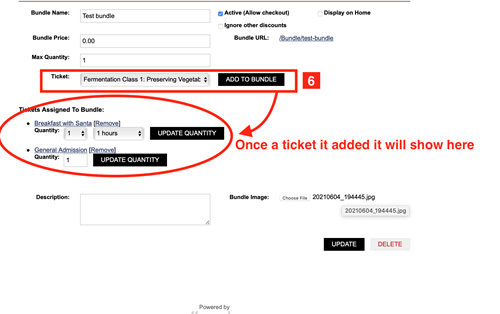
6. Ticket Box- Click the box to get a list of tickets that you can bundle together. Find the one you want, click add to bundle. You will need to add at least two tickets to bundle together.
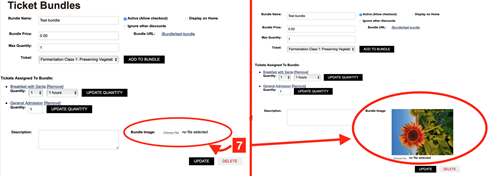
7. You can add an image to this bundle. This picture will be shown by the ticket bundle. If you have chosen for it to show on the home screen this is the picture that will show on the home screen with the bundle option. Click choose file and pick the file you would like to use. You can edit this picture at any time.
8. Fill out the description box. This is where you can list what is included in this bundle.
9. Click update to save all the changes that you updated to your page. It is very important to remember to click update or your changes will not be applied.

10. If you want to edit an existing bundle. Go back to the existing bundles choose a bundle to edit and make the adjustments needed and then click update.
11. If you want to delete a bundle. Go to existing bundles and click the delete button. If you want to keep the bundle but take it off your page, simply uncheck the active box and it will go inactive without deleting the bundle.

Grouped tickets is a feature that allows you to have tickets grouped together so that when they are purchasing a ticket they have options or groups right on the screen that allows them to add other tickets to their cart from the screen they are on.
1. Go to your Dashboard, click on Tickets.
2. Click on Manage Groups Tab

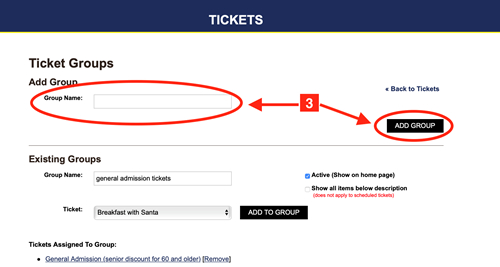
3. Fill out the Group Name and click add group.
4. Scroll the existing groups until you see the group you just created.
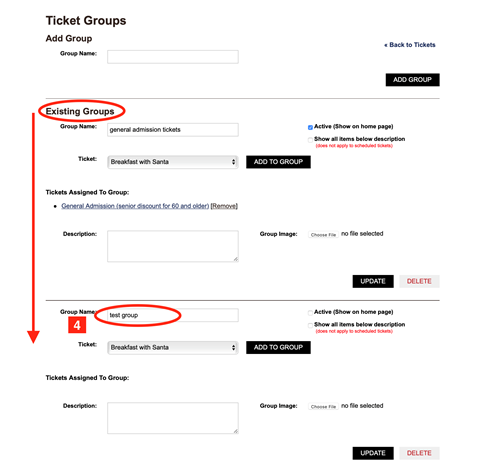
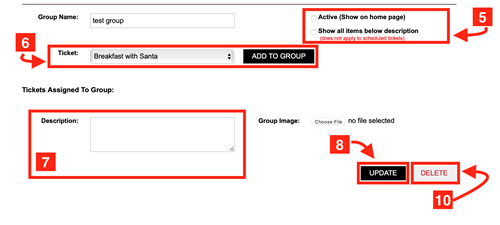
5. Check what applies:
i. Active- if checked this will make the group an option to click on at the home page with the tickets that you grouped together. If left unchecked the group is still active but it does not have an icon on the home page for that group. It will still show the grouping when you click on tickets that you have grouped together.
ii. Show all items below description.
6. Choose from the ticket box which ticket you want to group. Click add to group. It will then add that ticket under Tickets Assigned to that Group, and you can see which tickets you have grouped together. You can then add another ticket if needed until your group is done.
7. Fill out the description box.
8. Click update. This is important if you don't click update then the changes you made will not be applied.
9. You can make changes at anytime. Just go to your existing groups make the changes needed and click update.
10. If you would like to delete a group, click the delete button and those tickets will no longer be grouped together.
11. If you look at the ticket individually it will tell you what groups it is in and you can select which ones you want it to appear in.
If you have more questions the clip below walks you through it!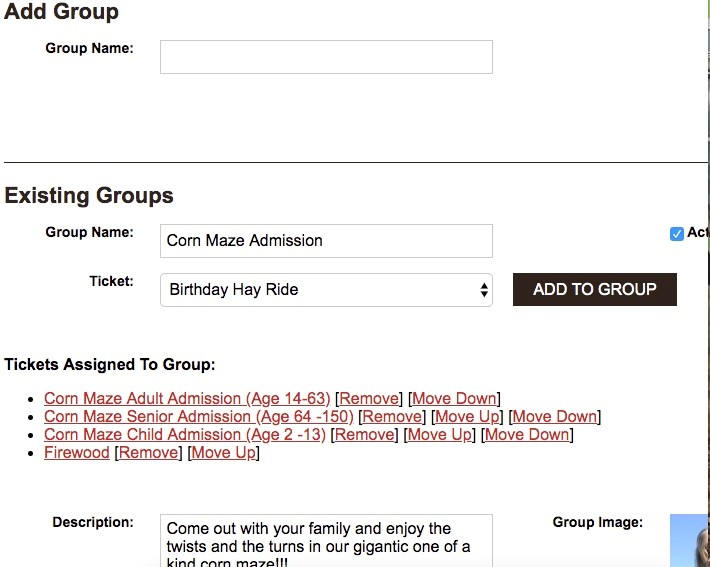
Ticket Redemption
Quick Touch Redeem
- On the customer's phone/device open the FARMpass conformation email. This email will have instructions on how to redeem their ticket.
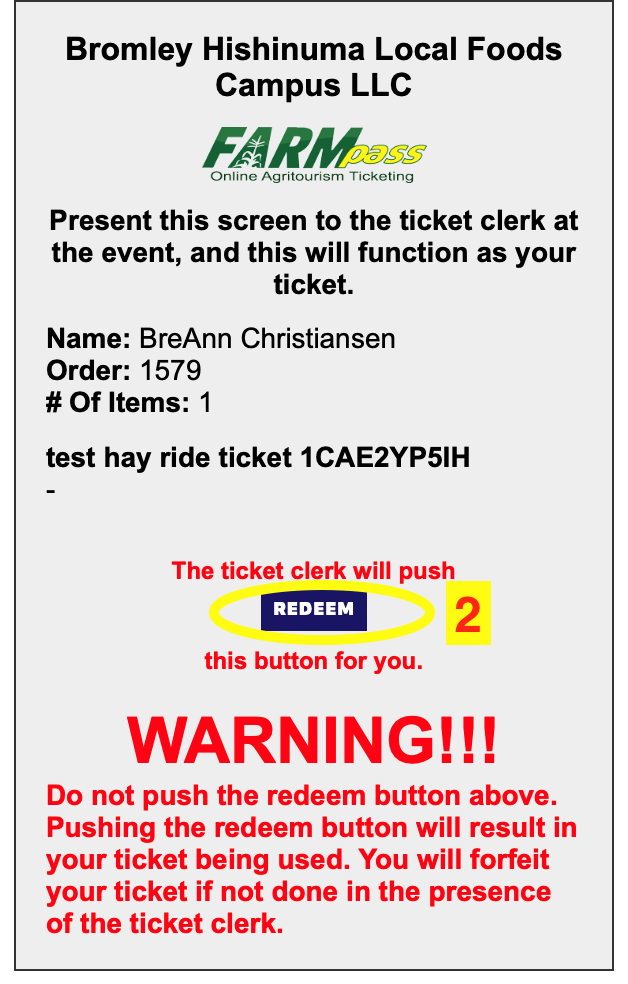
1. Click on Open FARMpass, this will open to the screen the customer will bring to the ticket stand.
2. Customer will show their phone/device to ticket clerk, they can then hit redeem, or redeem all on the customers device.
3. If it is pass ticket check the photo for identification.
4. Another way to redeem is to scan the QR code on the ticket.
Walk through the whole process with the clip below.
Ticket Clerk Redeem
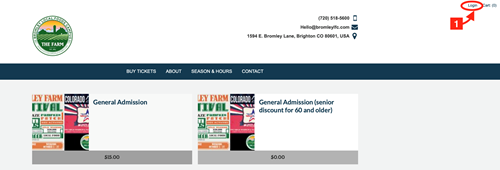
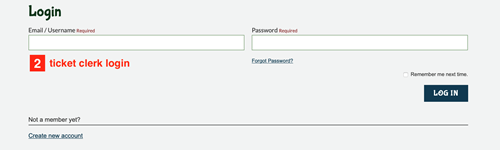
1. Click login on your page.
2. Login. Administrator logins won't have the ticket clerk option. Make sure you are logged in under a ticket clerk employee account.
i. Ticket clerk logins have access to the ticket screen only. They will not be able to access or see anything else about the website.
3. Ticket clerks can search for tickets by name or email.
4. Click scan for the QR code, or search by the ticket number.
5. Clerks can search by the check order number.
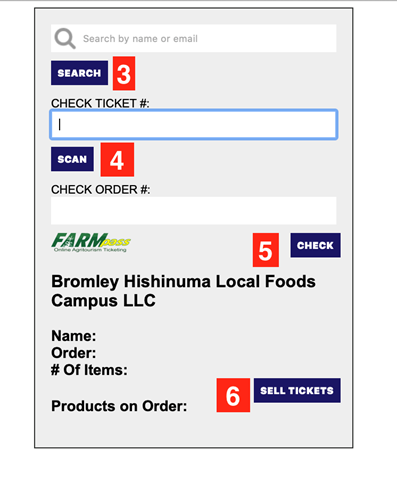
6. Ticket clerks can also sell tickets onsite. Click sell tickets, this will bring up options for them to sell a ticket in person.
Refunds
1. Go to your Dashboard and click Reports.
2. Choose orders from the choices. It is at the top of the list.
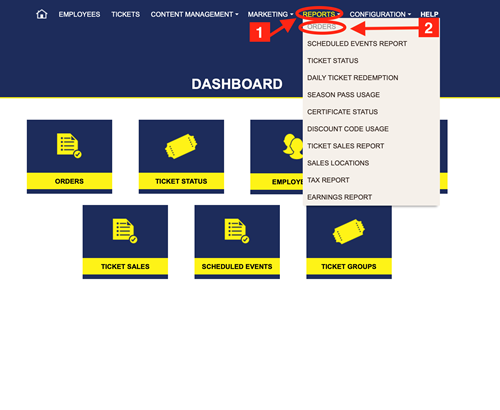
3. Find your ticket. You can search by ticket number, name, email, order number. Once found click on the ticket number.

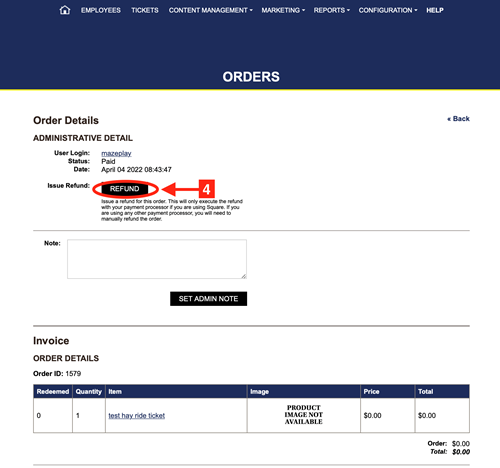
4. Click refund. This will refund the ticket on the FARMpass system. If you are using Square this will also refund the customer their money. If you are using any other platform you will need to go to your credit card company and refund them from their site.
5. Instead of refunding there is an option to do a gift certificate if that applies to your situation. They are very easy to make and send. Found out how on the Gift Certificate section on this page.
Un-redeem a ticket
1. Go to your Dashboard and click Reports.
2. Choose ticket status from the choices.
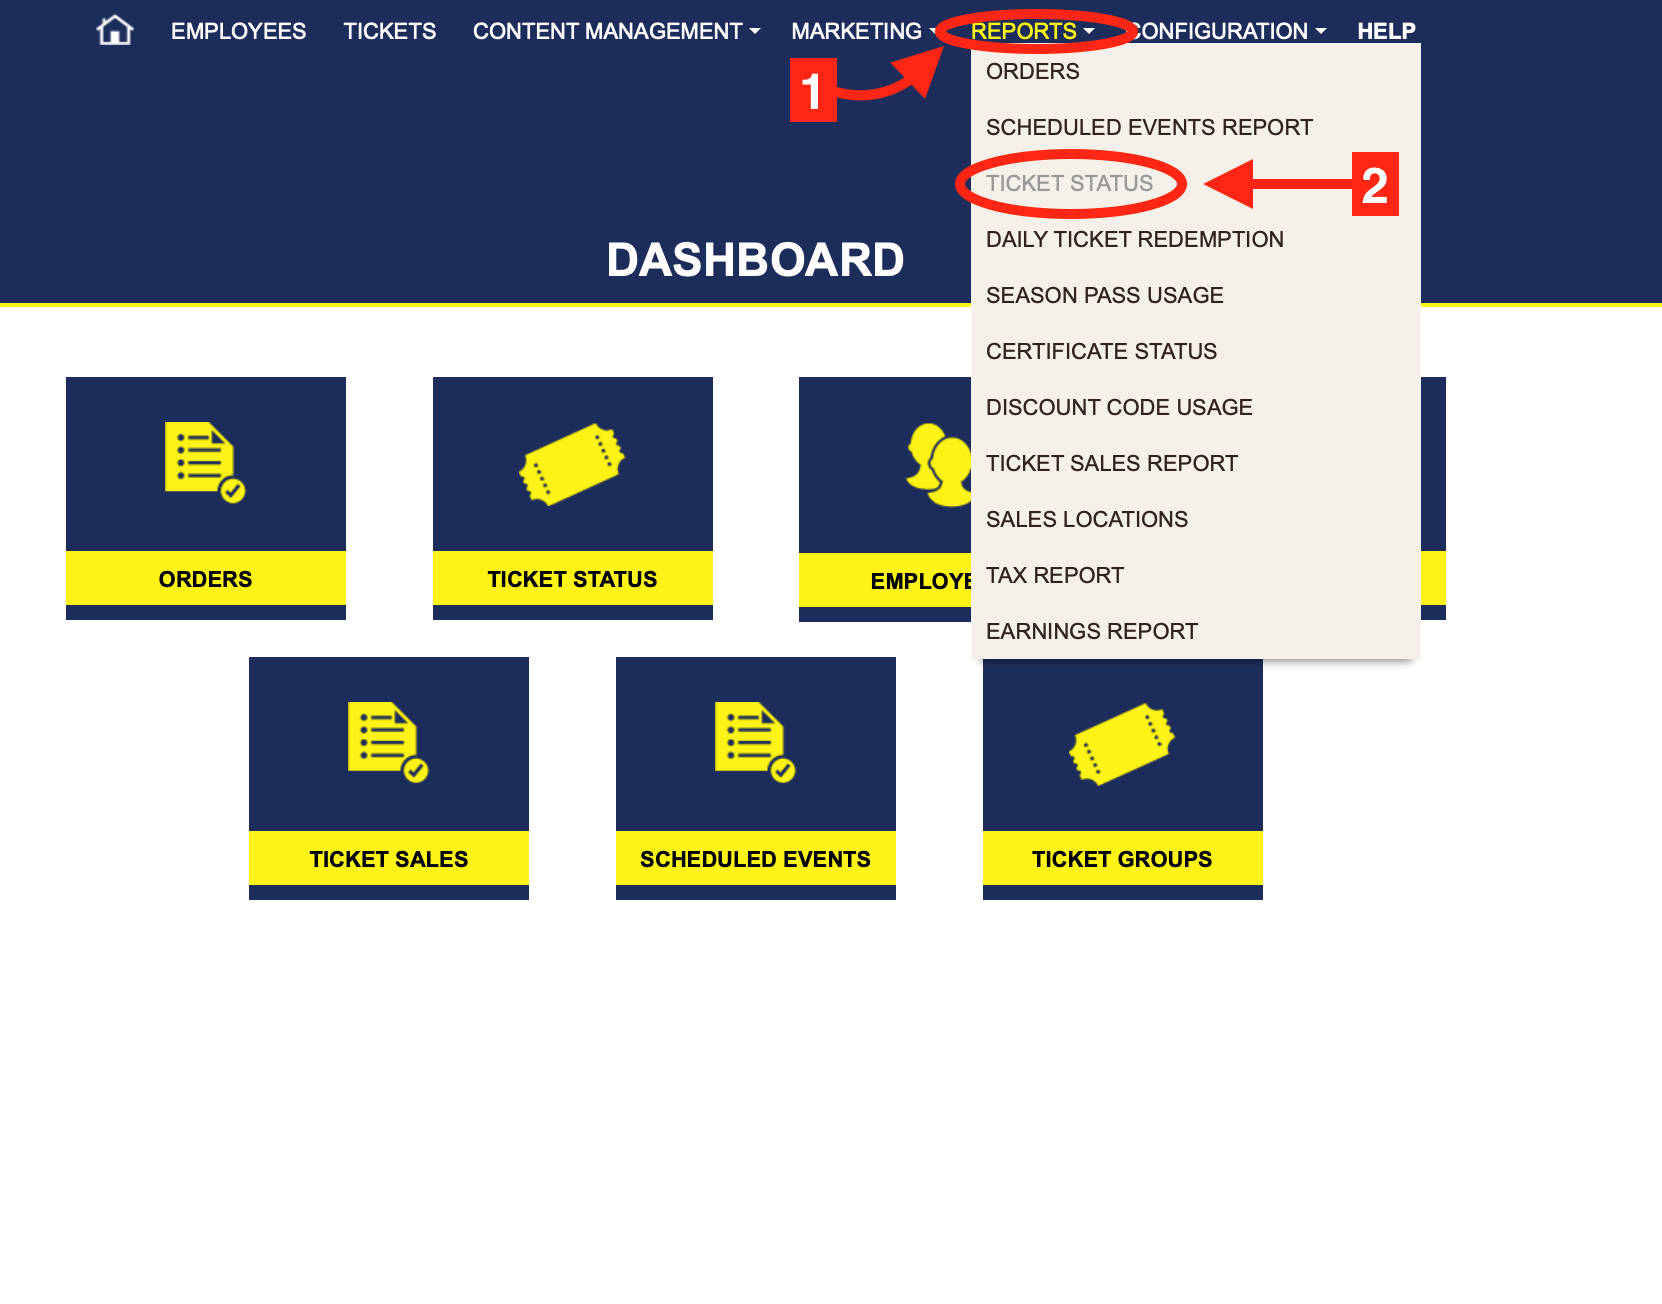

3. Enter the order #. This will pull up the ticket and will tell you the date and time the ticket was redeemed.
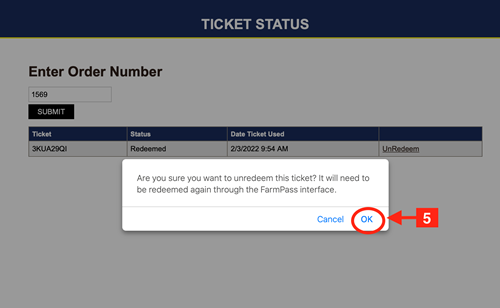
4. Click un-redeem.

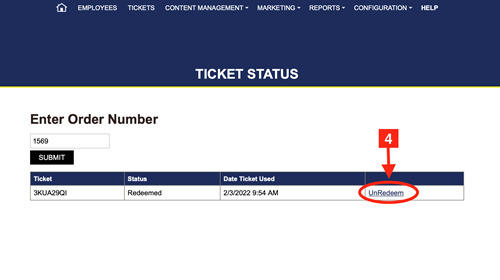
5. Click ok on the pop up.
Buying Tickets
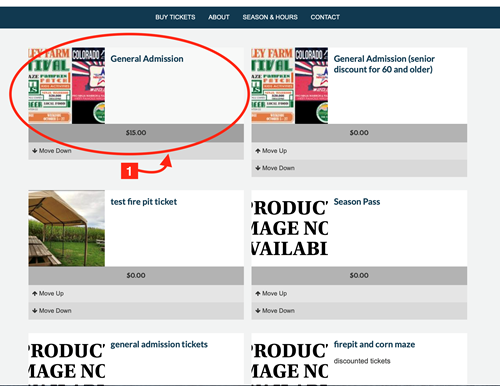
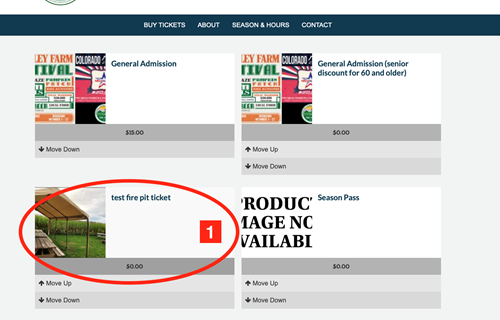
To buy a ticket, the customer selects the link in your website. It will then take them to the home options where they can scroll through and select the tickets they want.
Buying a Regular Ticket- how it looks for your customers.
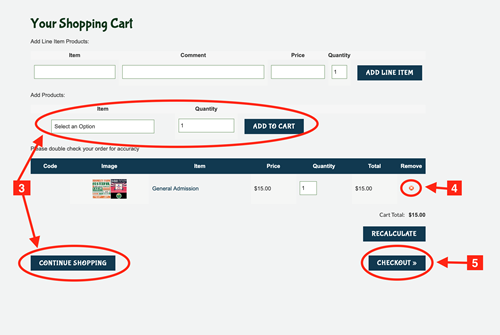
1. Choose the ticket.
2. Pick your quantity the default is 1.
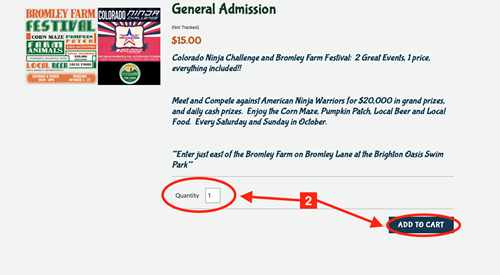
3.Customers can either click continue shopping and look around some more, or add more tickets from the item box.
4. To delete a ticket, click the X under remove.
5. When done shopping click checkout.
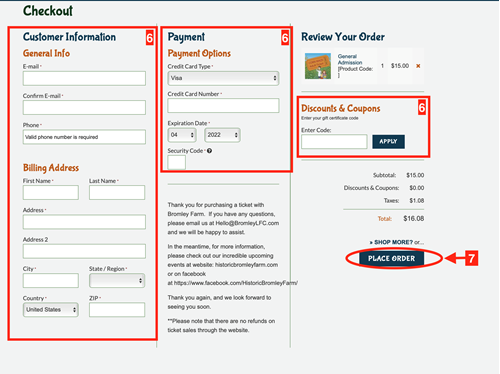
6. Fill out the following information:
i. General Information
ii. Billing
iii. Payment
iv. any discount codes, coupons, or gift certificates
7. Click Place Order. FARMpass will send out a conformation email with instructions on how to redeem, and the ticket details.
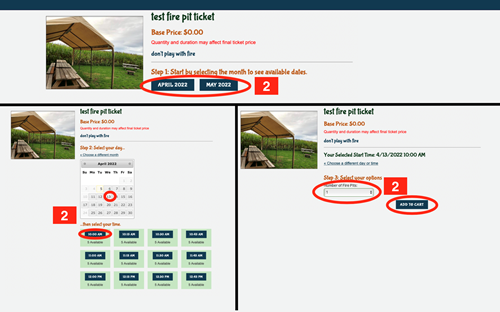
Scheduled Tickets
1. Click on the ticket you want to buy.
2. Pick your month, date, and time for the ticket. Grayed out days are unavailable days. Once you have your date and time, choose the quantity and click add to cart.
 3.Customers can either click continue shopping and look around some more, or add more tickets from the item box.
4. To delete a ticket, click the X under remove.
5. When done shopping click checkout.
6. Fill out the following information:
i. General Information
ii. Billing
iii. Payment
iv. any discount codes, coupons, or gift certificates
7. Click Place Order. FARMpass will send out a conformation email with instructions on how to redeem, and the ticket details.
Pass ticket- season pass
1. Click on there season pass on the home page.
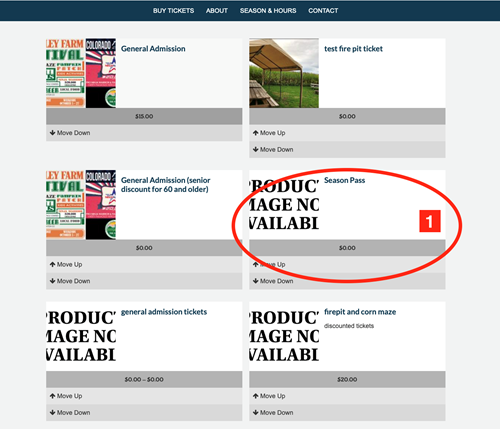
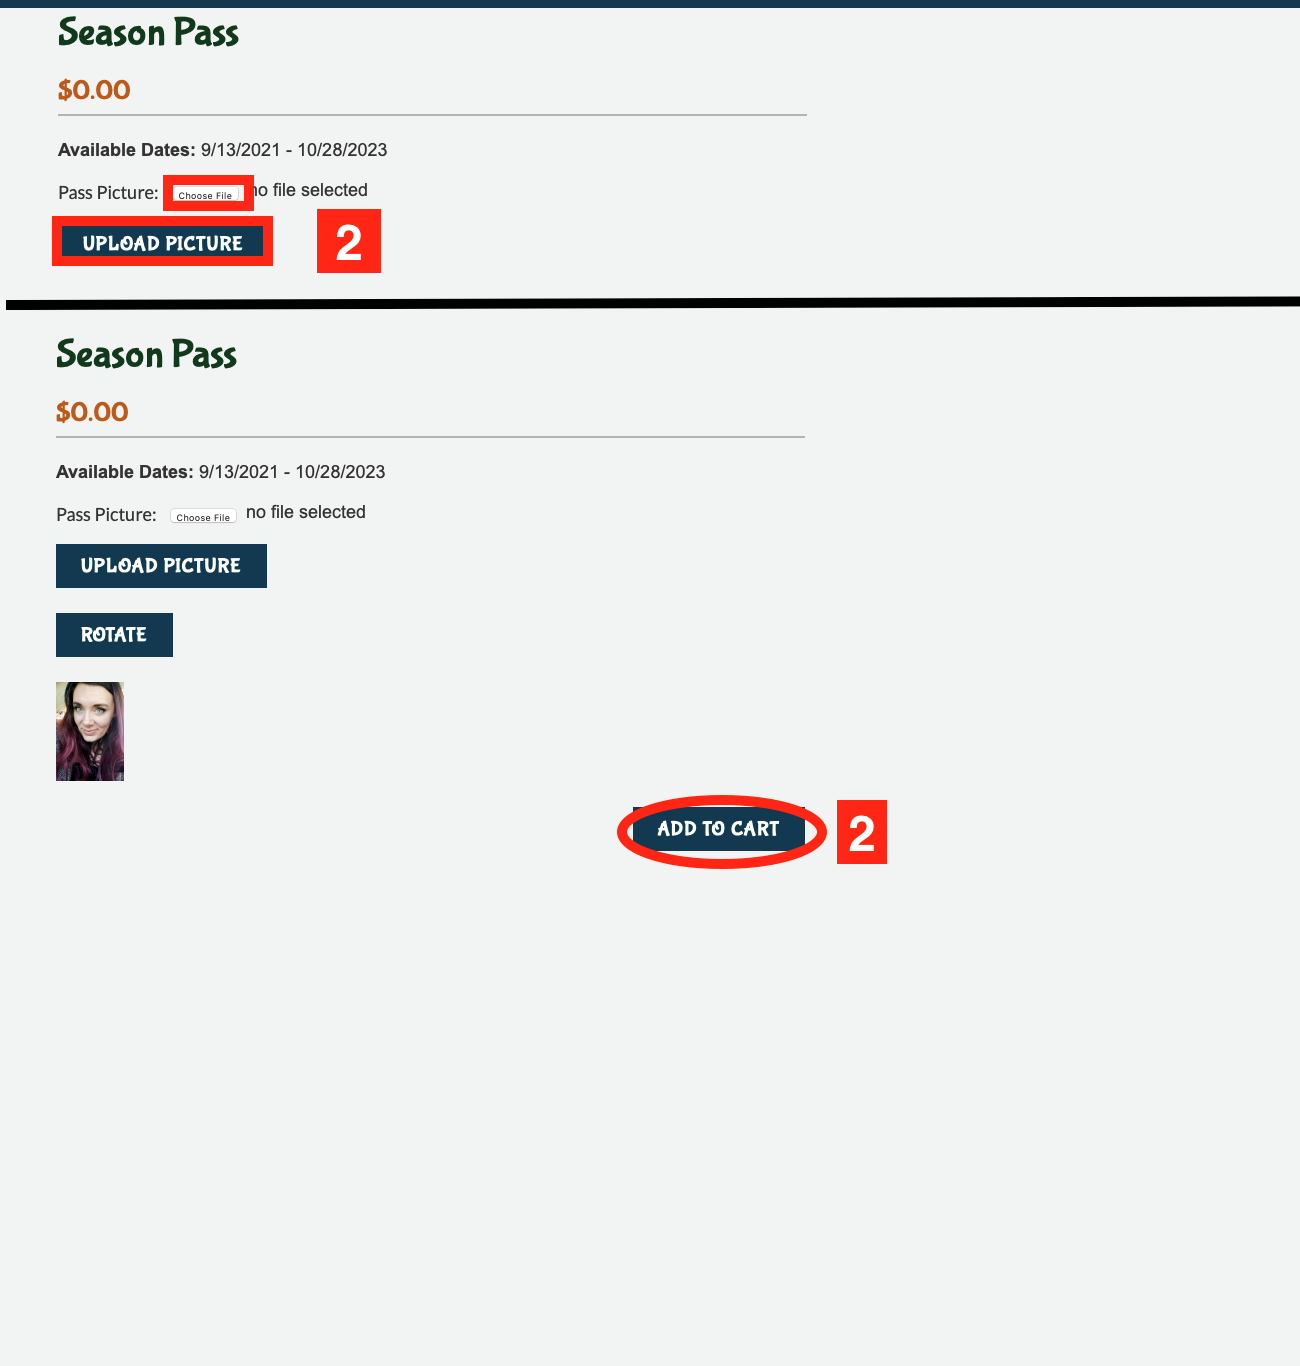
2. The pass will show the dates that it is good for and how many uses. Customer will need to upload a picture before they can move forward.
i. Choose your file.
ii. Click upload picture, it will show the picture on the screen.
iii. Click add to cart.

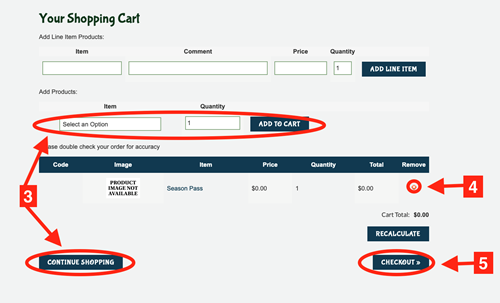
3.Customers can either click continue shopping and look around some more, or add more tickets from the item box.
4. To delete a ticket, click the X under remove.
5. When done shopping click checkout.
6. Fill out the following information:
i. General Information
ii. Billing
iii. Payment
iv. any discount codes, coupons, or gift certificates
7. Click Place Order. FARMpass will send out a conformation email with instructions on how to redeem, and the ticket details.
Reports
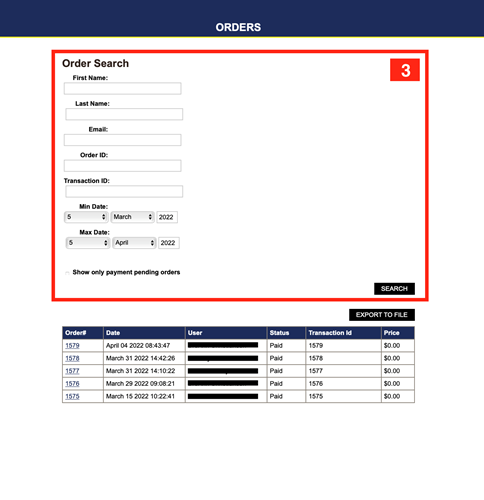
Find an order
1. Go to your Dashboard, click on reports.
2. Choose orders from the choices, it will be at the top.

3. You can search for an order by:
i. Name
ii. Email
iii. Order number
iv. Transaction ID
v. Dates
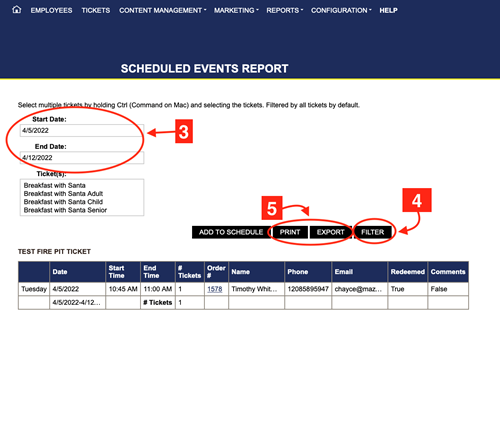
Scheduled Events Report
1. Go to your Dashboard, click reports.
2. Choose Scheduled Events Report from the choices.
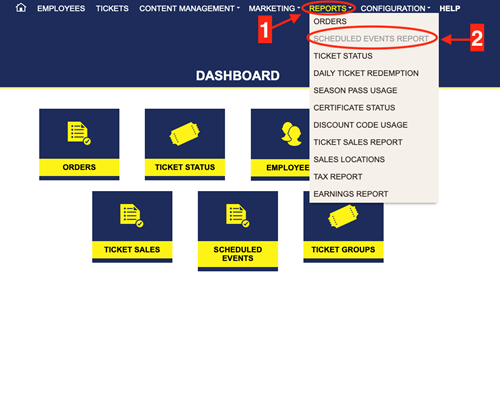
3. Select start and end date
4. Click filter
5. You can print or export the report.
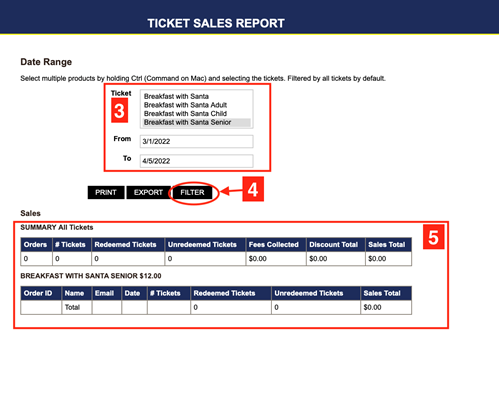
1. Go to your Dashboard, click on Reports.
2. Choose sales report.
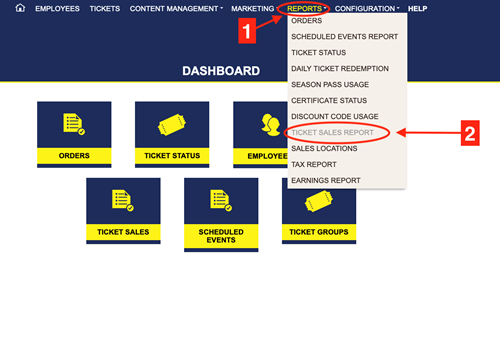
3. Pick the ticket type and dates.
4. Click filter.
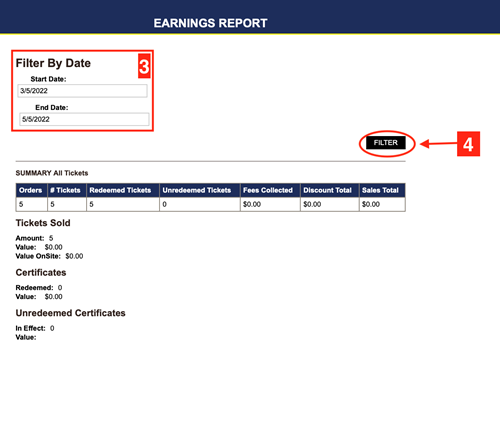
5. This report will tell you:
i. Orders
ii. # of tickets
iii. Redeemed tickets
iv. Un-redeemed tickets
v. Fees collected
vi. Discount totals
vii. Sales total
viii. Dates
ix. Email
x. Names
xi. Order ID
Ticket Status
1. Go to your Dashboard click on Reports.
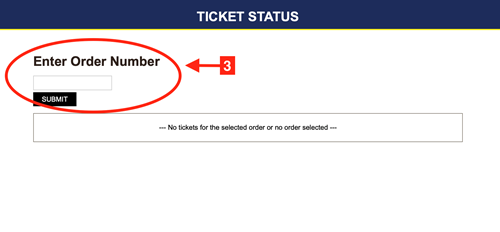
2. Choose ticket status from the choices.
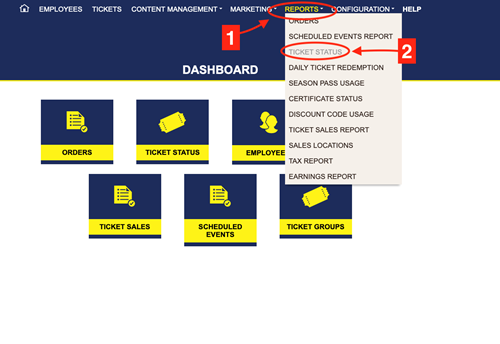
3. Enter your order number, click submit.
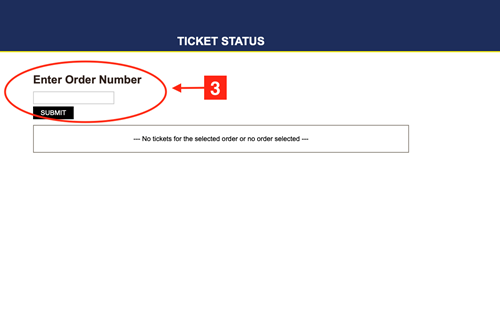
4.The ticket will pull up and and tell you the status and if it has been redeemed.

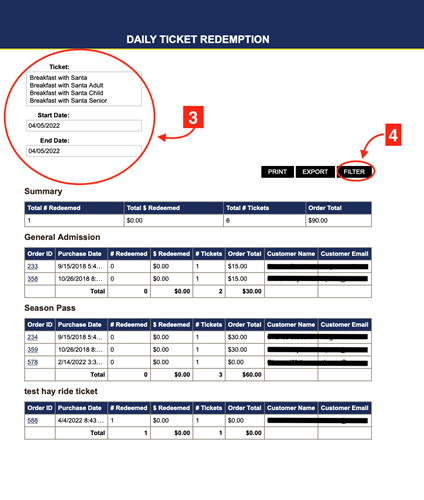
Daily Ticket Redemption Report
1. Go to your Dashboard and click on Reports.
2. Choose daily ticket redemption
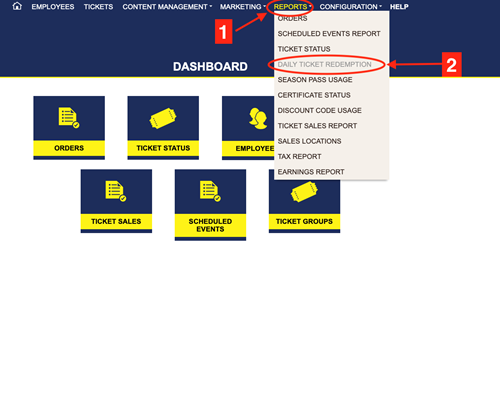
3. Select the ticket type and start and end dates.
4. Click Filter.

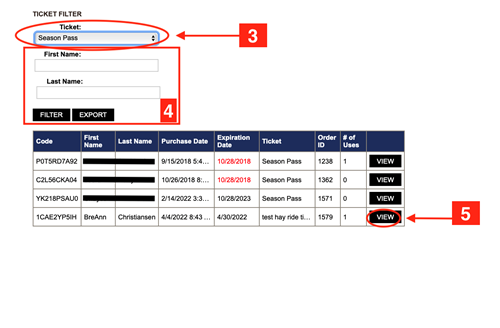
Season Pass Usage
1. Go to your Dashboard and click on Reports.
2. Choose season pass usage.
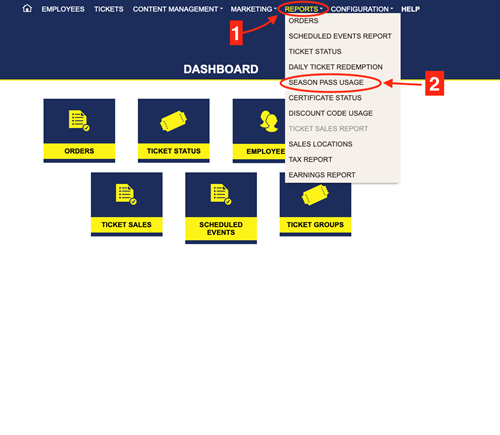
3. Ticket Box drop down choose Season Pass.
4. You can search for a specific pass with first and last names.
5. Find your ticket and click on view.
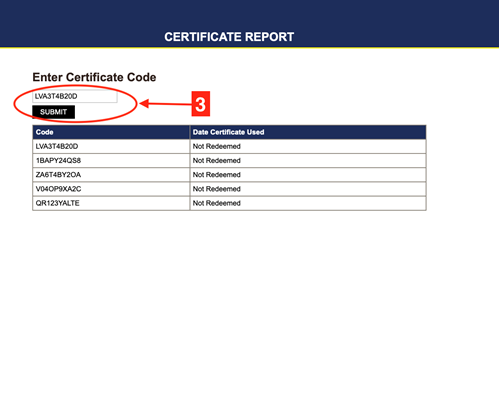
Certificate Status Report- the report can be used to check on gift certificates to see if they have been used. You will need the gift certificate code to run this report.
1. Go to your Dashboard, click on reports.
2. Choose certificate status.
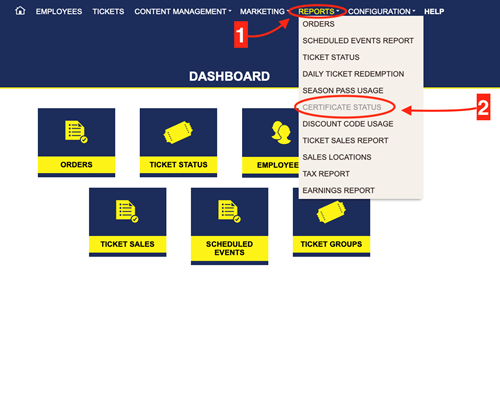
3. Enter the certificate code, click submit.
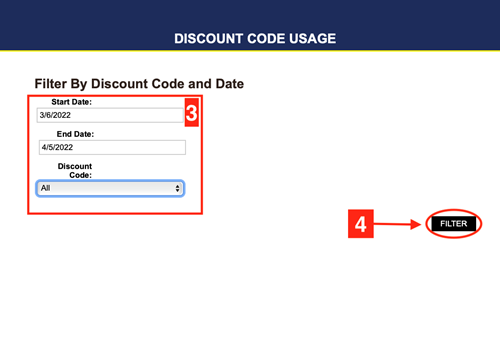
1. Go to your Dashboard, click on reports.
2. Choose discount code usage.
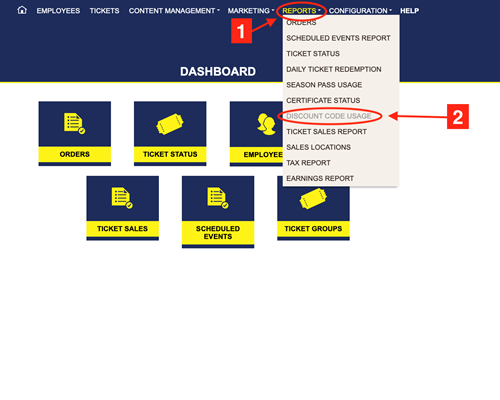
3.Set the dates, and pick your discount code.
4. Click filter.
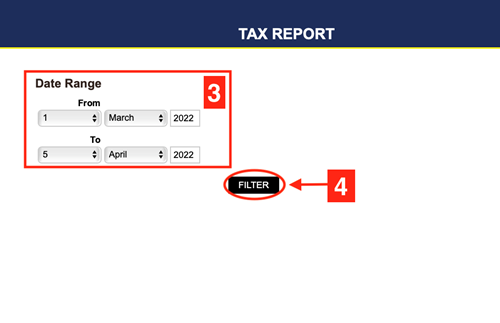
1. Go to the Dashboard and click on Reports.
2. Choose tax reports.
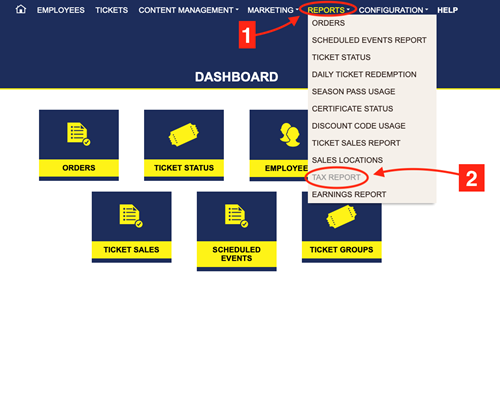
3. Pick the dates.
4. Click filter.
1. Go to your Dashboard and click on Reports.
2. Choose earnings report.
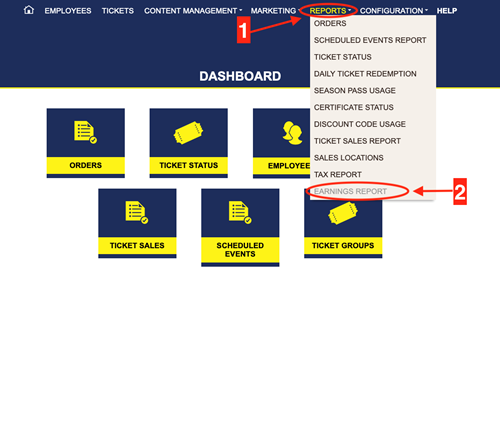
3. Pick start and end dates.
4. Click filter.
Marketing
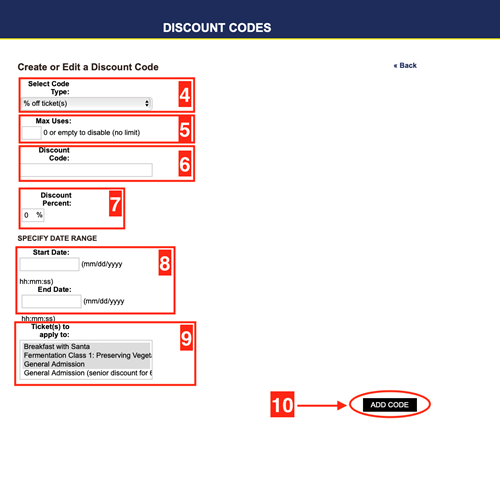
Discount codes are a great way to run sales and keep track of what advertisements are working. Remember that the codes are not active until the start date. So you set the dates and want to do a trial run to make sure its working before you send it out, make sure the date is set to the day you are trying it!
1. Go to your Dashboard click on Marketing.
2. Choose discount codes.
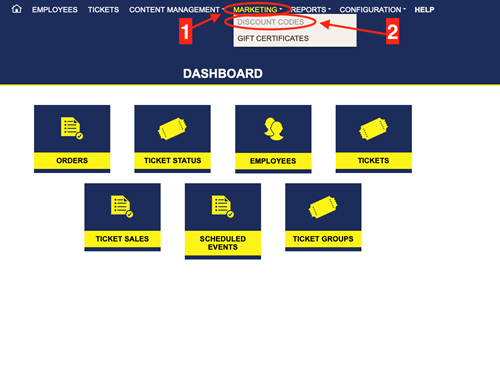
3. Click create new discount code.
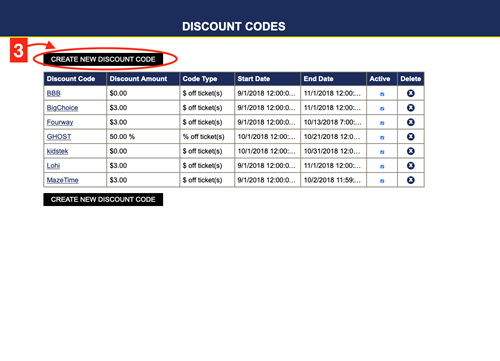
4. Select code type.
5. Max uses- blank or 0 will be an unlimited use.
6. Fill in the discount code. Examples, SAVE10, FUN10
7. Discount percentage this box changes according to the code type you choose in step 4.
8. Fill out the start and end dates you want this code to be active.
9. Pick the tickets the code can be used on.
i. Click and hold shift to pick more than one ticket.
10. Click add code.
Edit or Delete Discount Codes
1. Go to your Dashboard, click on marketing.
2. Click on discount codes.

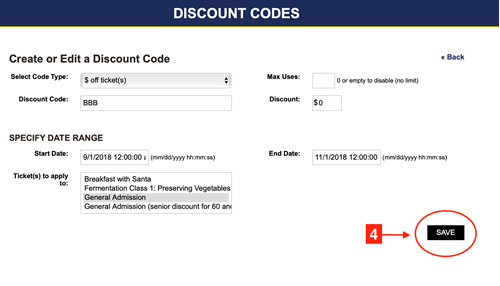
3. Choose the code that needs edited or deleted.
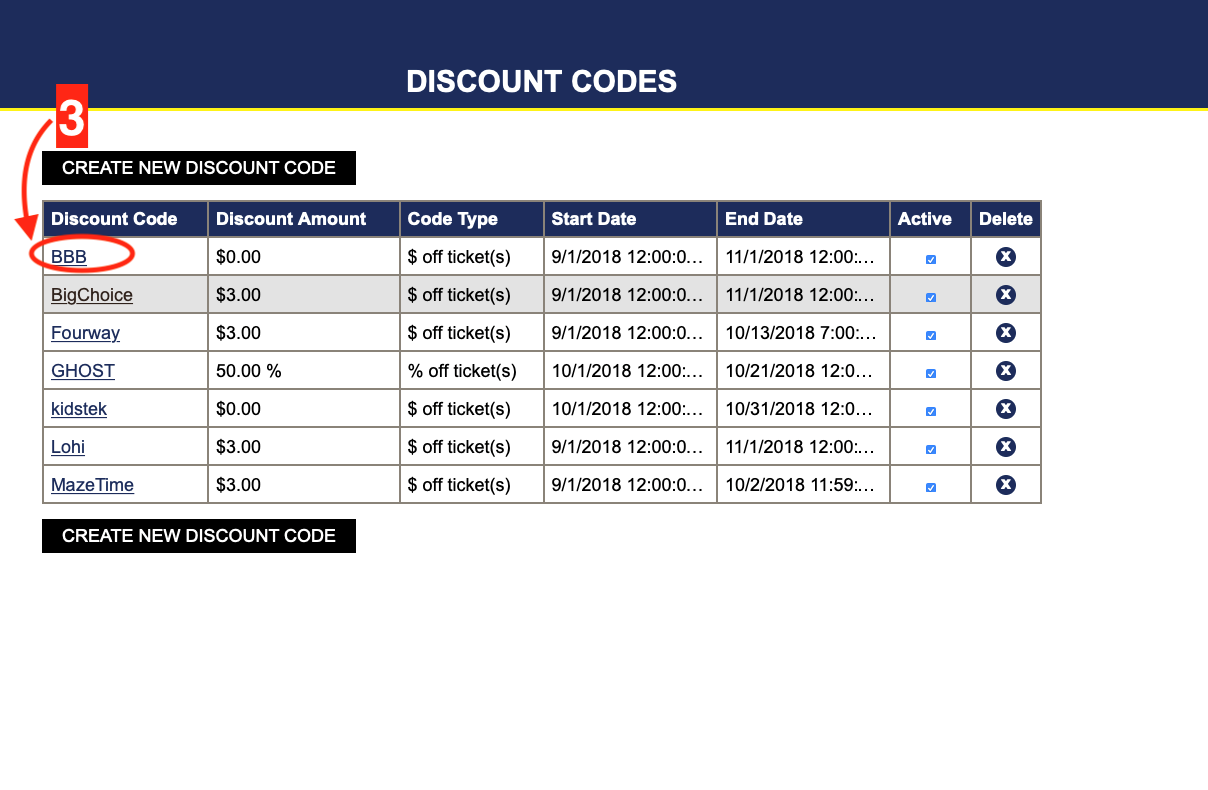

4. Make the change needed and click save.
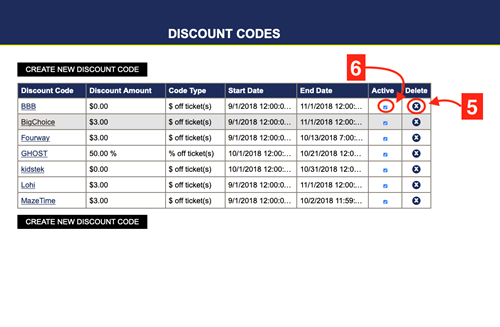
5. To delete -click the small x in the delete column.
6. Another options is to deactivate the code. To do this uncheck the small blue check in the active column. This deactivates the code, but it is still saved for you to use again if needed.
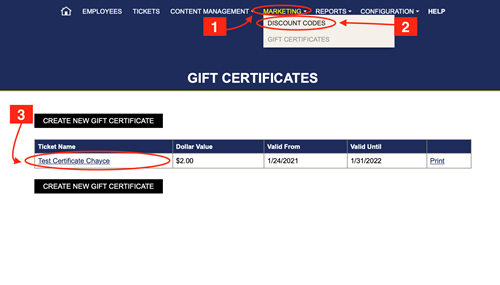
1. Go to your Dashboard, click on Marketing.
2. Choose gift certificates.
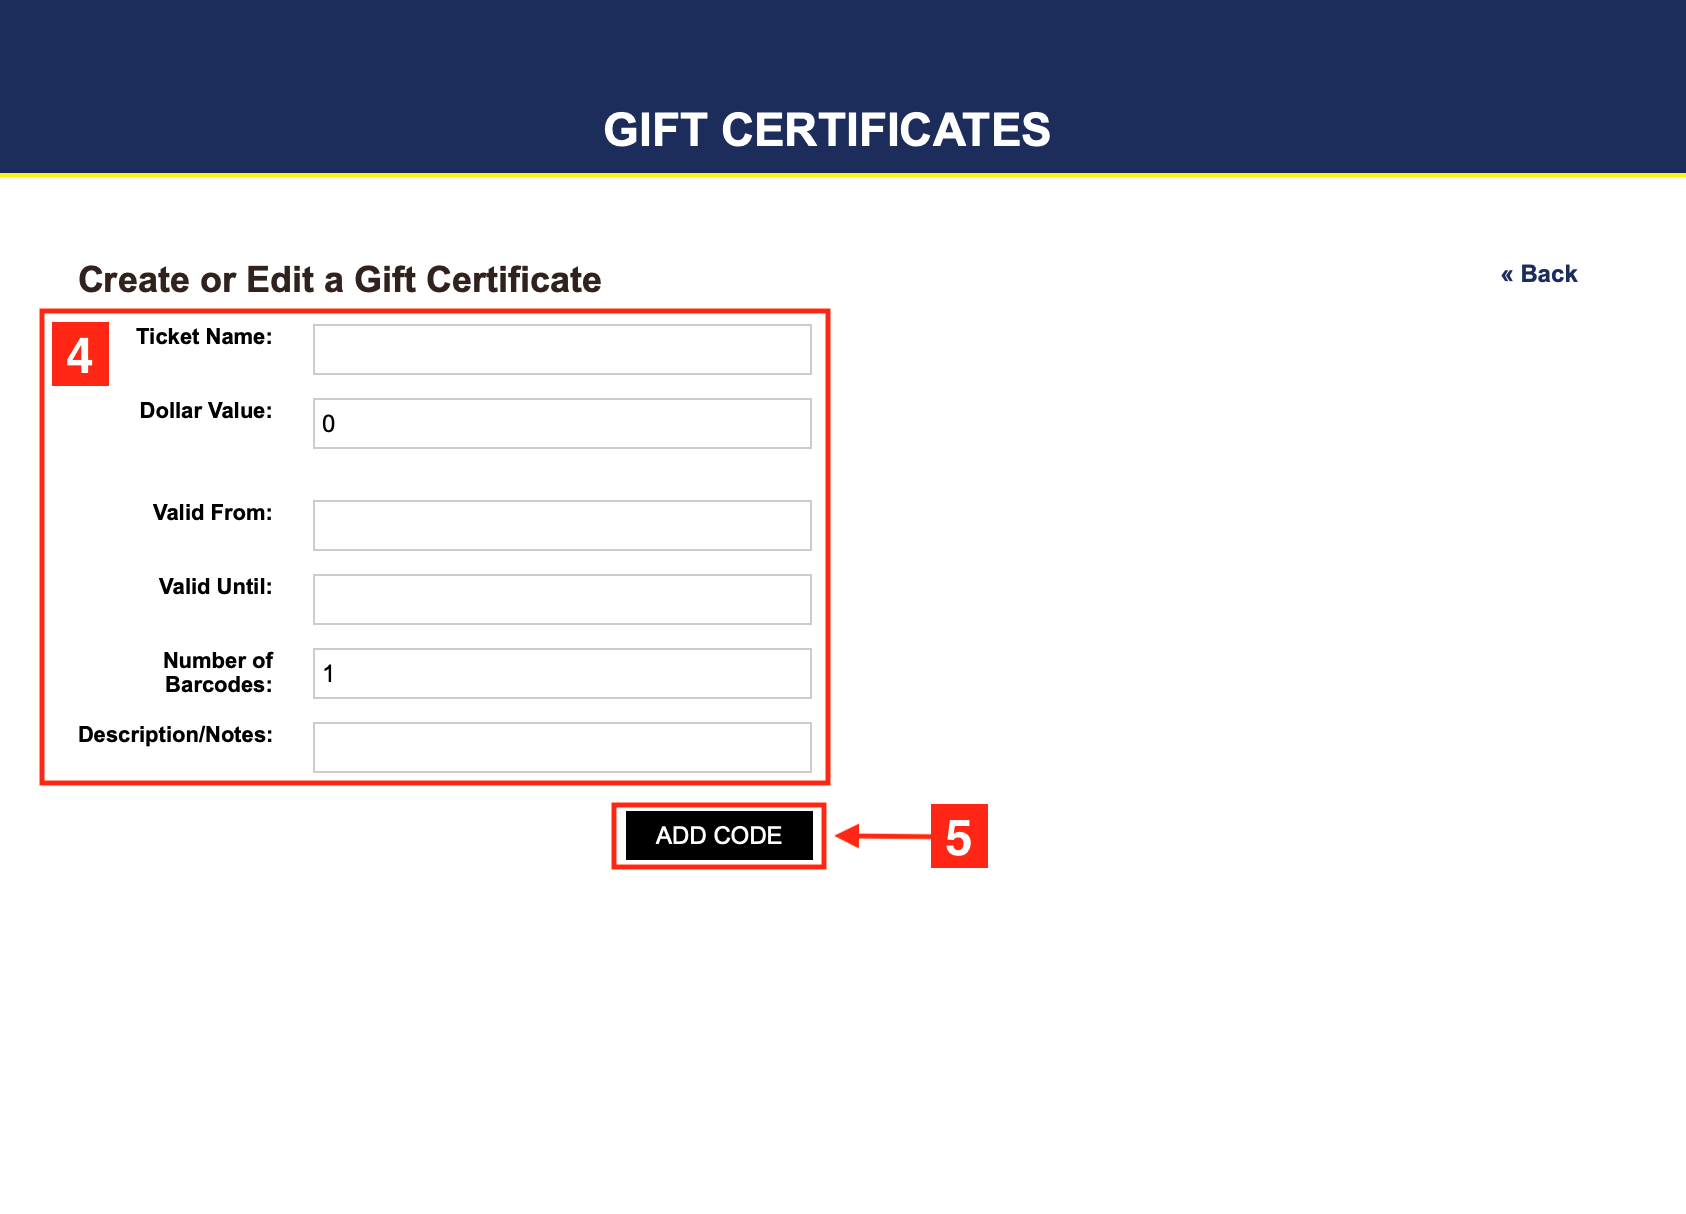
 3. Click create new gift certificate.

4. Fill out the following:
i. Ticket name
ii. Dollar Value
iii. Dates valid- click on the box to bring up a calendar to choose from.
iv. Number of barcodes- This is the amount of gift certificates under this name. It will generate a different code for each one. These codes can be used at check out by customers. For example if you are giving the radio station 10 tickets this will print all 10 under the same order under the same name with different codes.
v. Descriptions/ notes
5. Click add code.

The clip below walks you through the whole process!
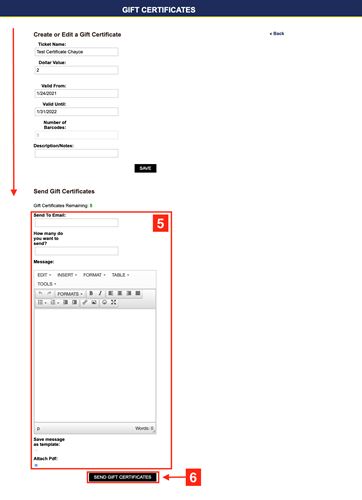
1. Go to your Dashboard, click on Marketing.
2. Choose gift certificate
3. Click on the gift certificate your want to send.
4. Scroll down to send gift certificates.
5. Fill out the following:
i. Send to email
ii. How many to send. If you chose to generate more than one, this will tell it how many to send to the email above.
iii. Message
6. Click send gift certificate.
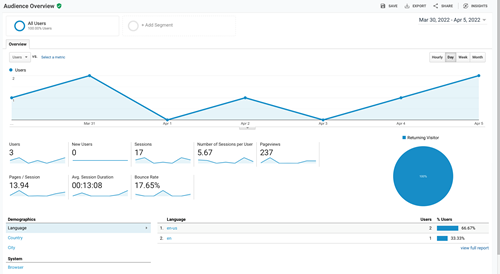
Google analytics helps you have a more complete understanding of how your customers engage with your business to help you deliver great experiences and results. This site will allow you to access graphs, information, and data on how your website is doing, how many tickets have been sold, and all the different demographic information needed to market and get more customers.

- If already have your own tracking ID from google analytics you can plug into FARMpass.
- If you don't have a tracking ID, contact FARMpass and we can get you your tracking ID. When you sign up for FARMpass we make a tracking ID for you that we can give you to use.
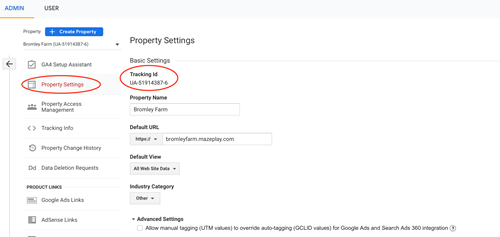
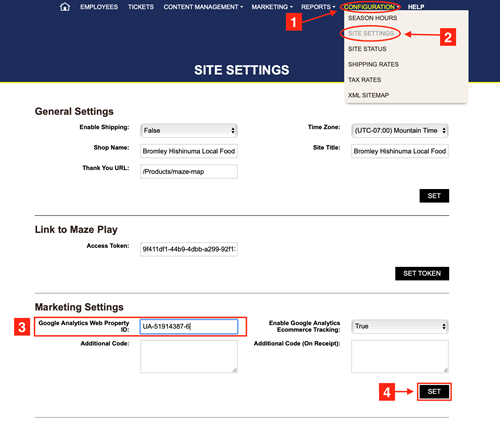
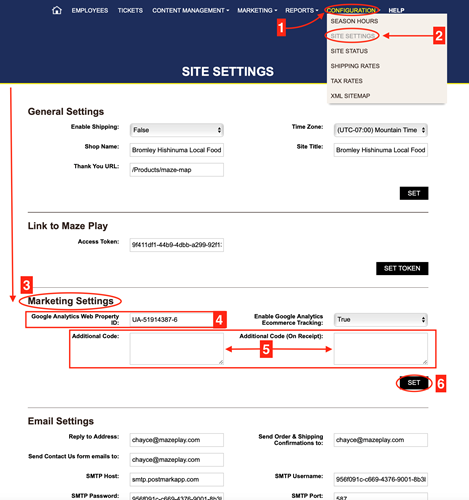
To input the Tracking ID into FARMpass
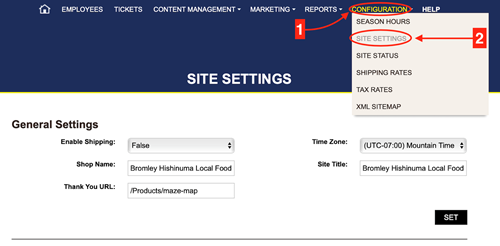
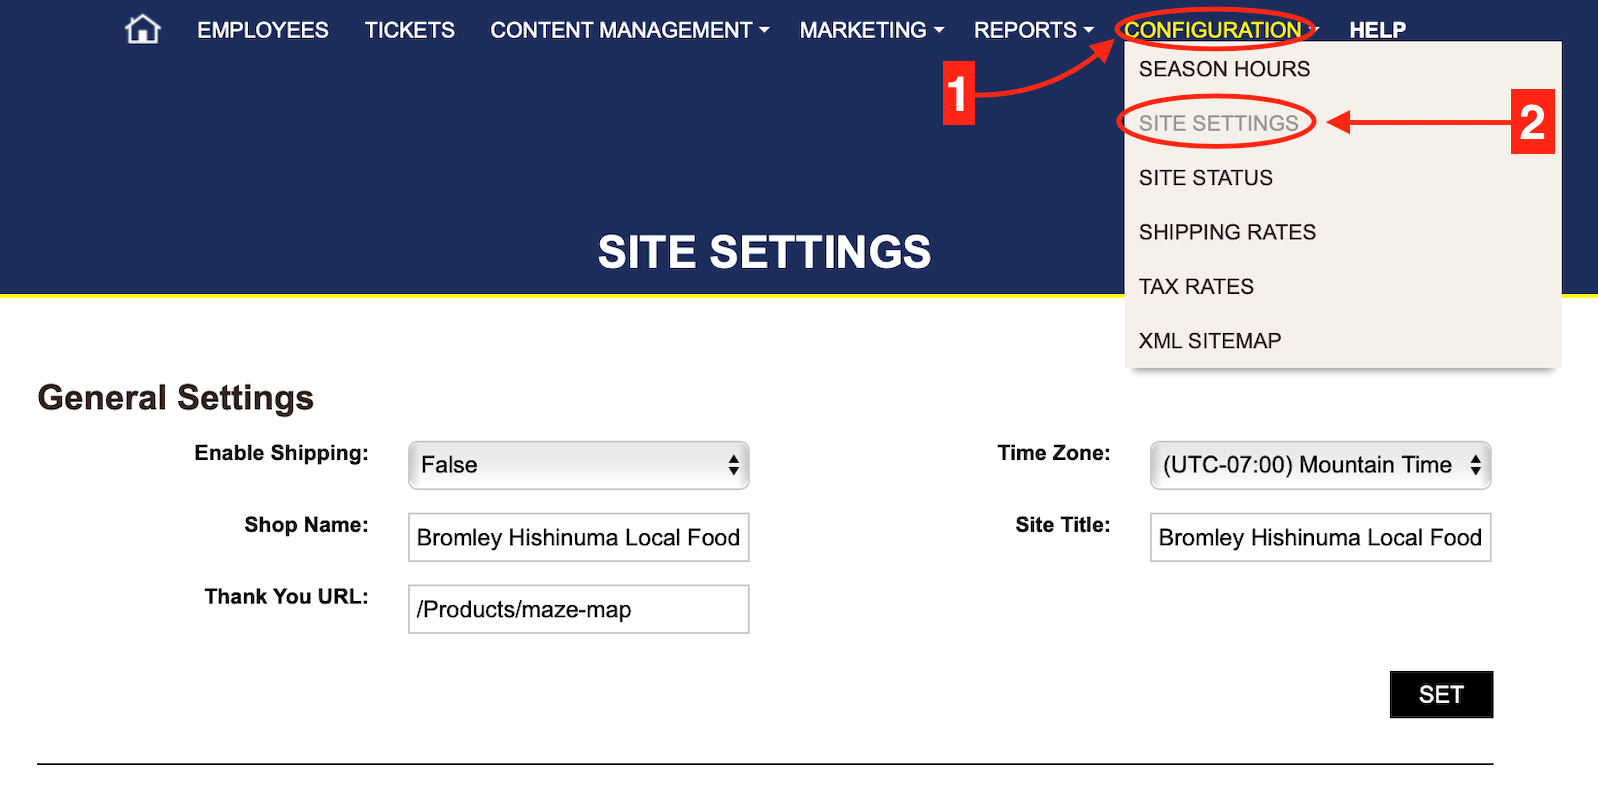
1- Go to your Dashboard, click on Configuration.
2. Choose Site settings.
3. Scroll down to Marketing Settings
i. Google Analytics Web Property ID- this is your tracking ID.
4. Click Set to save.
Creating a Group Discount
1.Go to your Dashboard and click Tickets.
2. Choose your ticket. Click on it.
3. Scroll down to Group Ticket- check the box.
4. Fill in the following:
i. Minimum group- This sets the lowest amount of tickets that can be bought for this ticket.
ii. Minimum group discount- the discount will not apply until this number has been met.
iii. Group discount- the amount off per ticket.
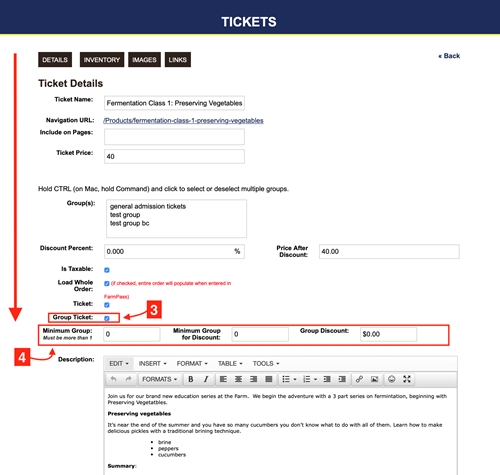
5. Scroll down to the bottom of the page, click save.
Facebook Metapixel is a piece of code for your website that lets you measure, optimize and build audiences. To use a Metapixel with your FARMpass website it is an easy process. Follow the steps below.
Find your pixel on your Facebook Events Manager tab. This is on your company's Facebook page settings.
1. Go to your Facebook page, Event Manager
![]()
2. Choose connect a new data source
![]()
3. Name your pixel.
![]()
4. Enter the your FARMpass website URL.
5. Choose Pixel only, it's the 2nd choice.
![]()
6. Choose manually add. This will give you a code to copy and paste.
![]()
1. Go to your FARMpass Dashboard, click on configuration.
2. Choose site settings.
3. Scroll down to Marketing Settings, copy and paste the pixel in the additional code box and the (on receipt ) box.
4. Click set.
![]()
Configuration
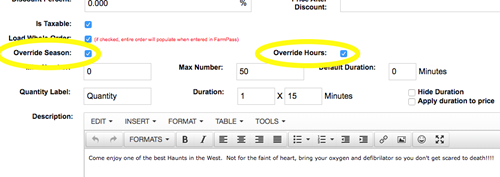
-Pull up the ticket you want to change.
-Click the boxes for Override Hours and Override Season.
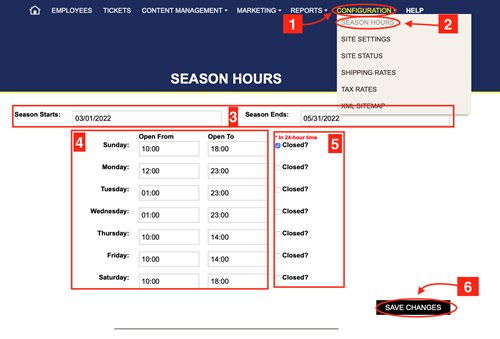
1. Go to your Dashboard and click on Configuration.
2. Choose season hours.
3. Set the dates.
4. Fill in or edit the weekdays.
i. REMEMBER- it is is military time! Set the time accordingly.
5. Click closed on the days that are closed.
6. Click save changes.
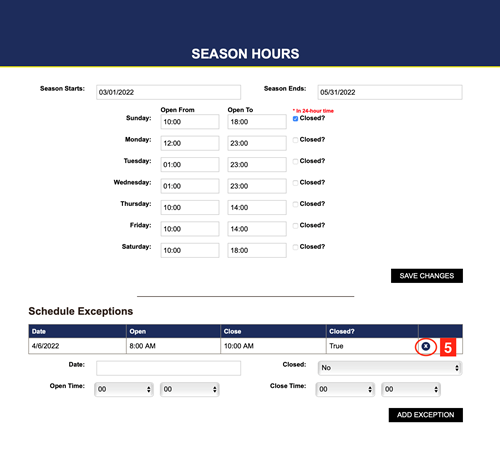
1. Go to your Dashboard, click on configuration.
2. Choose season hours.
3. Scroll to the bottom of the page. Fill in the boxes: date, closed, open time, closed time.
4. When done click add exception.
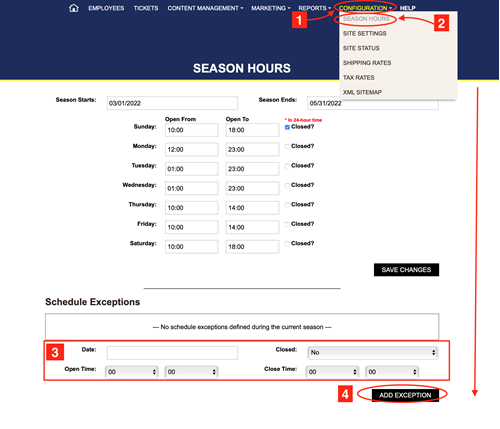
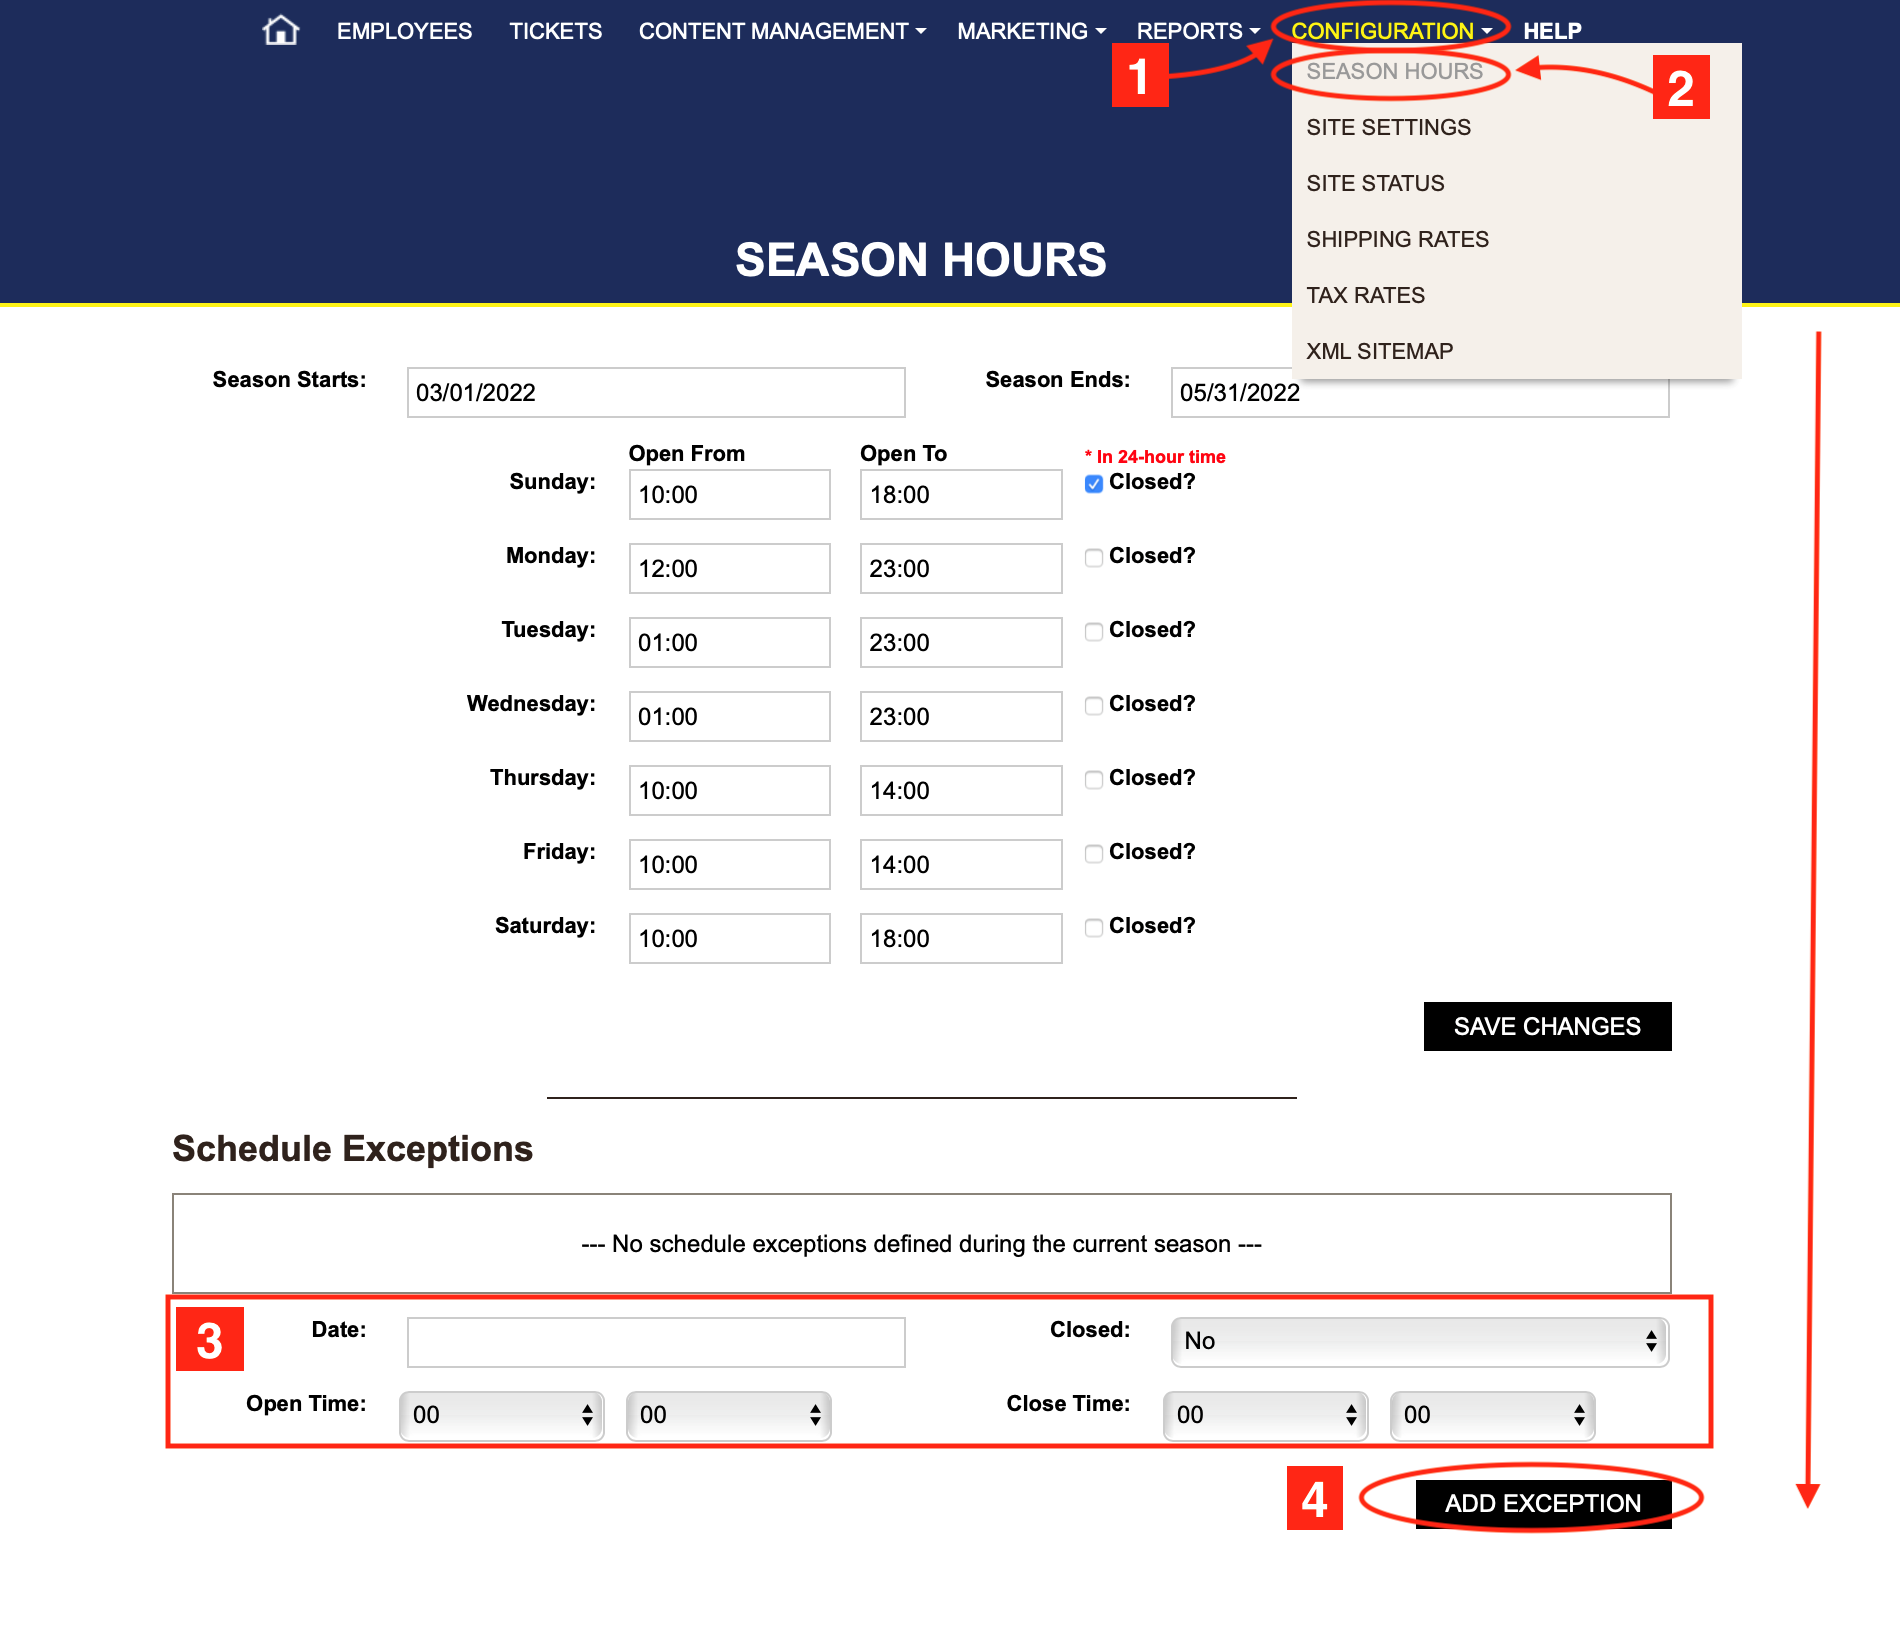
5. If you have more than one exception repeat the steps. To delete an exceptions click the x, and hit ok.
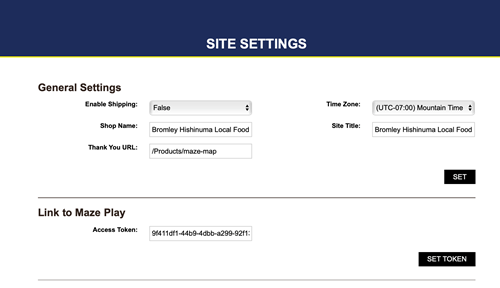
1. Go to your Dashboard and click configuration.
2. Choose site settings.
3. Fill out: Shipping, shop name, time zone, site title, thank you URL.
4. Click set.
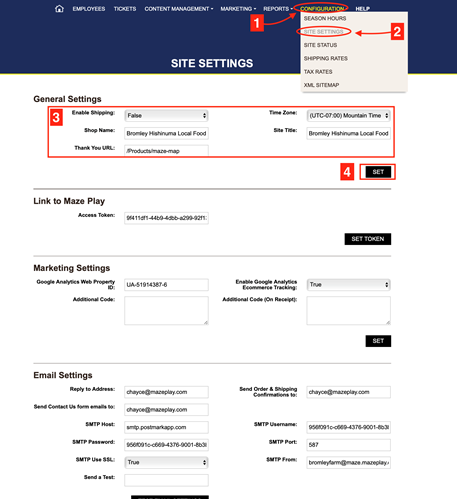
Link to maze play is code that allows FARMpass to link directly your site that is hosted on MazePlay.
- If you don't have a token please contact FARMpass and it will be given to you.
This is where you can put your code for google analytics, and Facebook Meta Pixels for your FARMpass website.
1. Go to your Dashboard, click on Configuration.
2. Click site settings.
3. Scroll down to marketing settings.
4. Google analytics web property ID- this is where the ID for google analytics goes. If you don't have your ID contact FARMpass. For more help see the Google Analytics section on the help page.
5. Additional code, and additional code (on receipt)- this is where the Facebook MetaPixel code goes. Make sure copy the code in both boxes. For additional help see the Facebook Pixel section on the help page.
6. Click set anytime you make any changes.
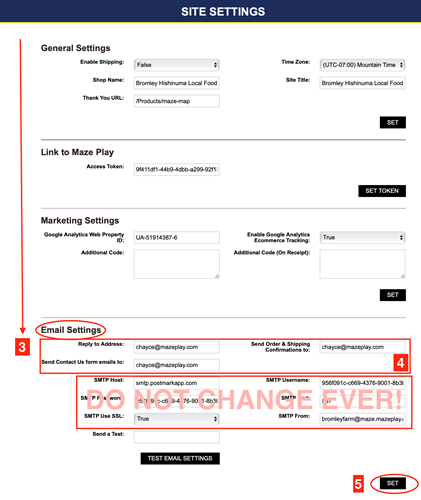
Email Settings
DO NOT CHANGE! -
- SMTP PASSWORD
- SMTP Host:
- SMTP Use SS
- SMTP Username:
- SMTP Port
- SMTP From
1. Go to your Dashboard and click configuration.
2. Choose site settings.
3. Scroll to email settings. REMEMBER- don't change anything that starts with STMP!
4. Fill out or make edits.
5. Click set.
Mailchimp is a free service that you can with FARMpass, you will need to create your own Mailchimp account.
1. Go to your Dashboard, click Configuration.
2. Choose site settings.
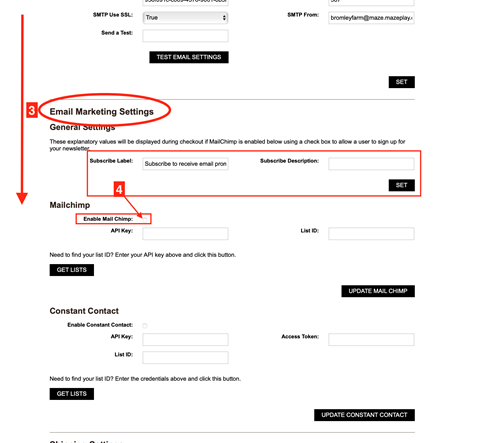
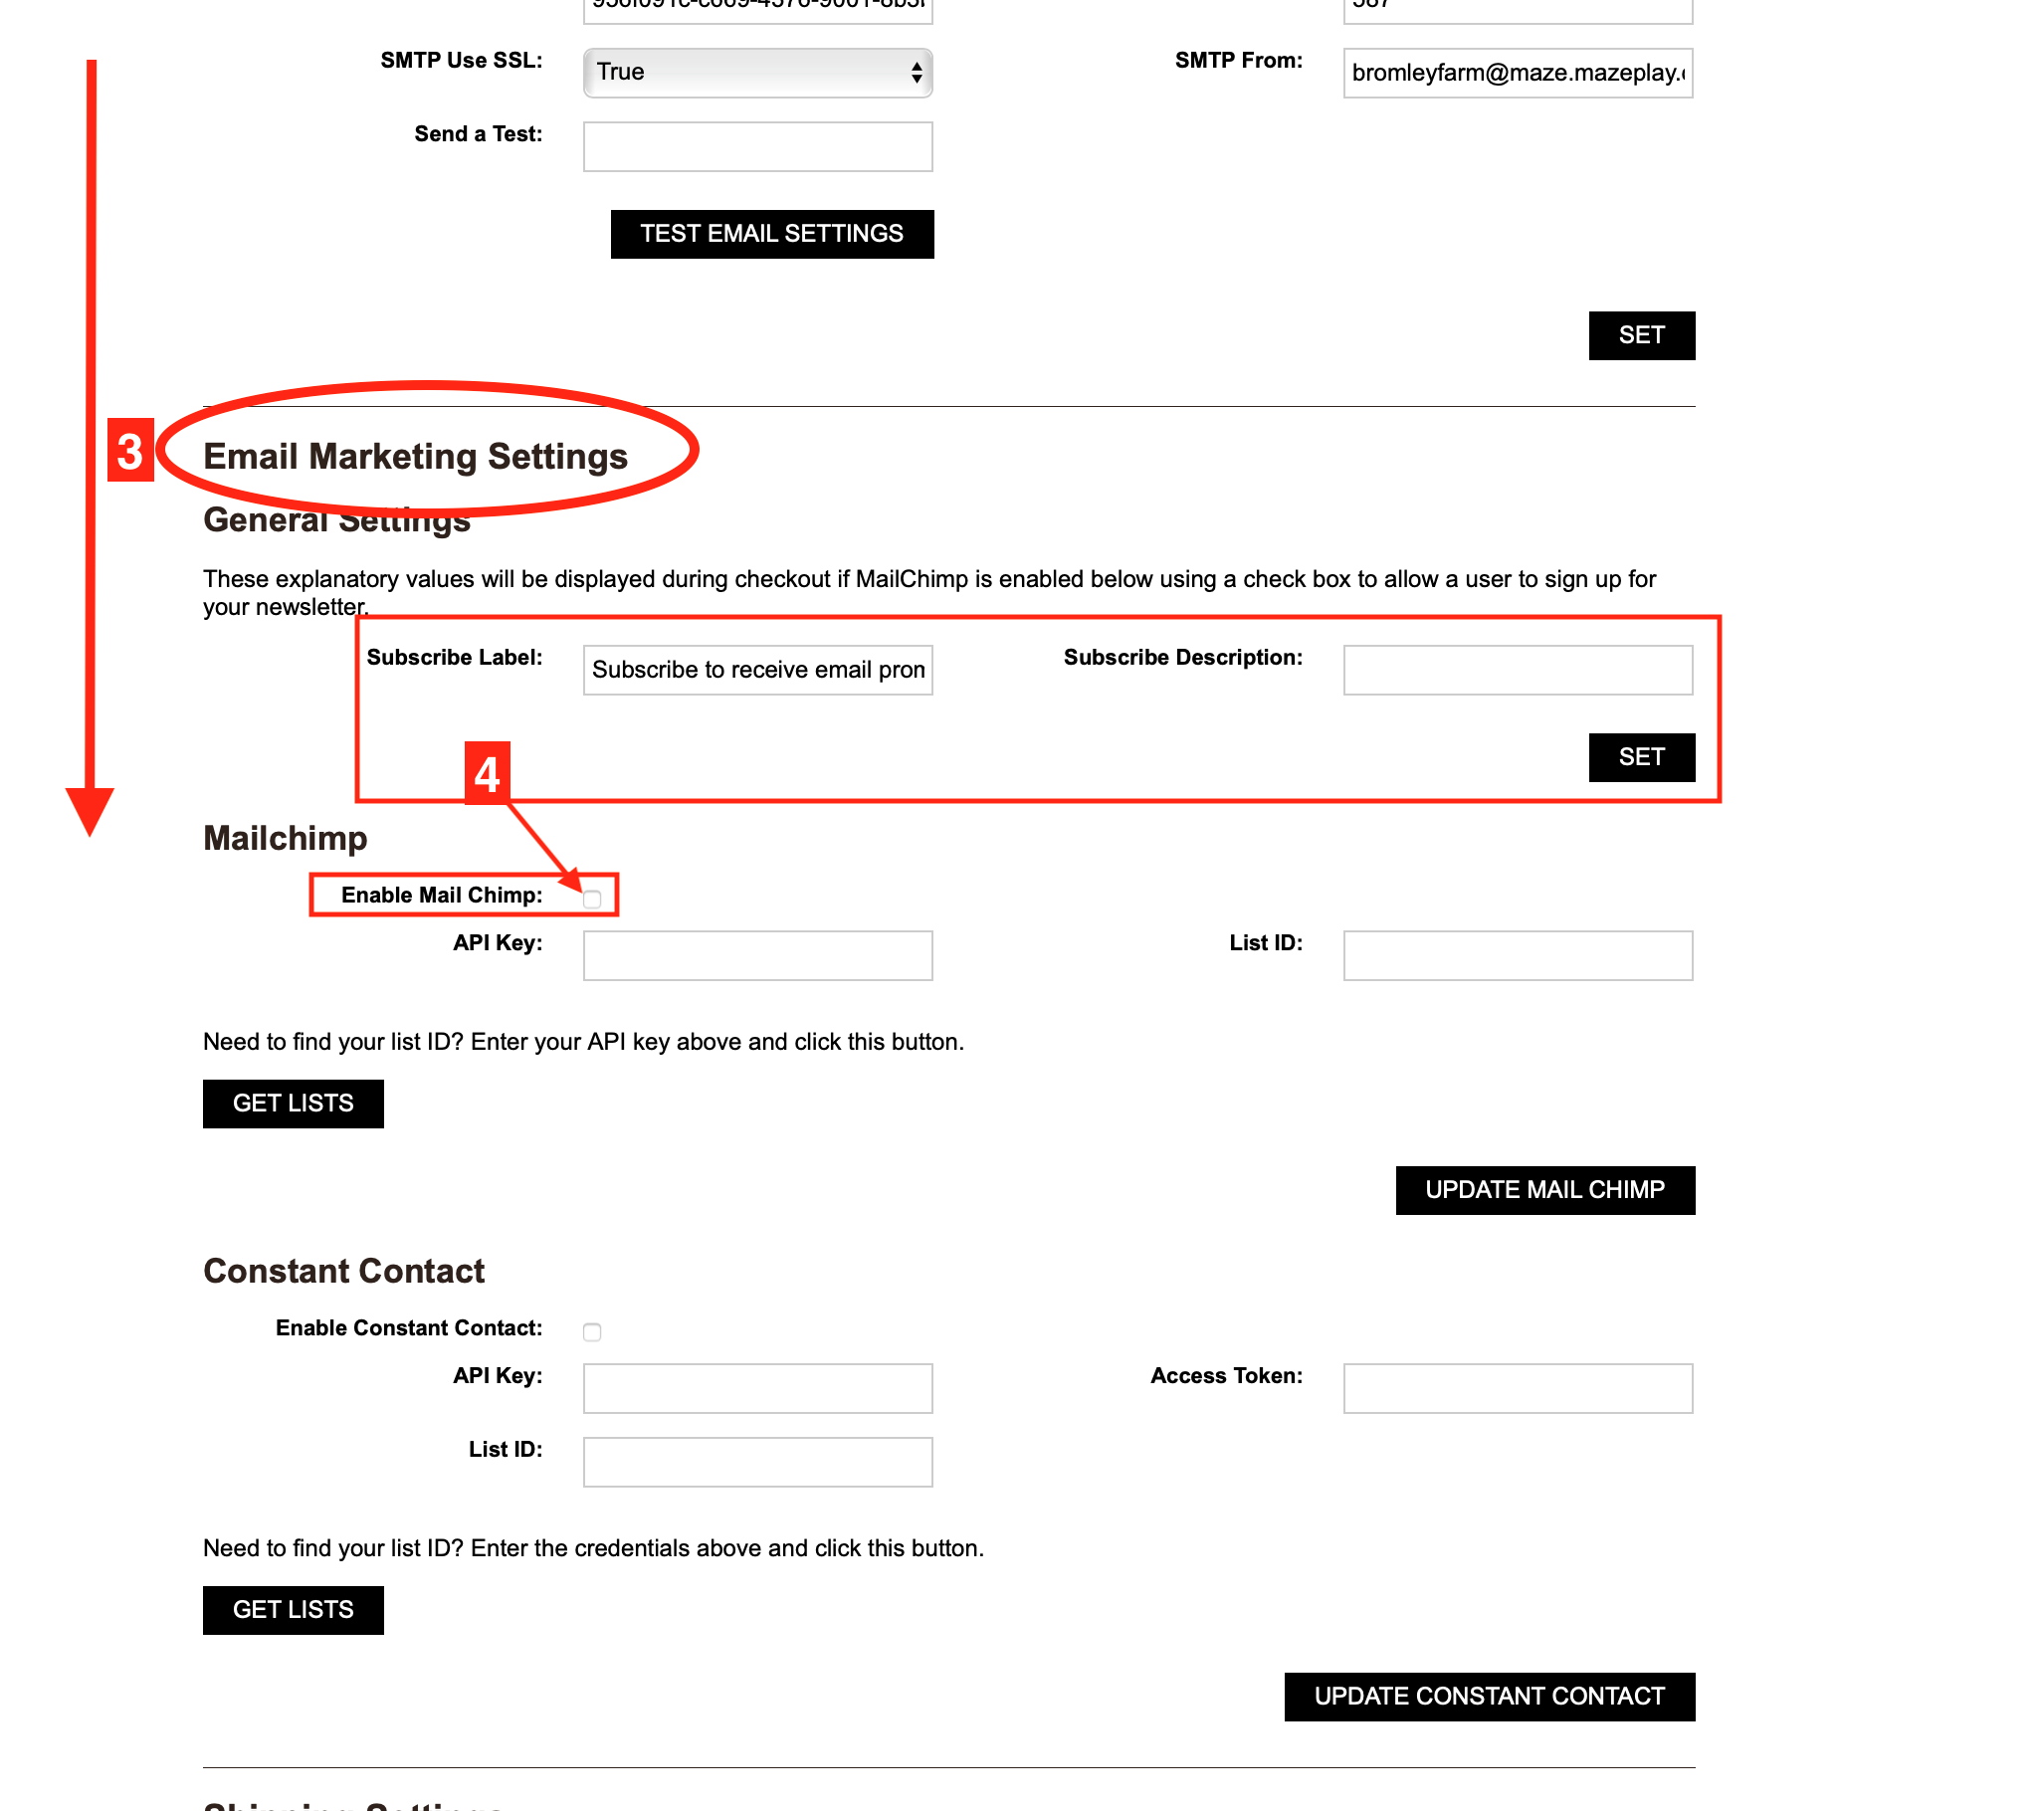
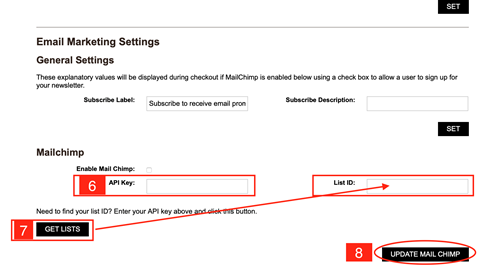
3. Scroll down to email marketing settings.
4. Subscribe Label and Subscribe description. These will be displayed at check out if you have checked the enable mail chip box.
5. Set up an account with Mailchimp.
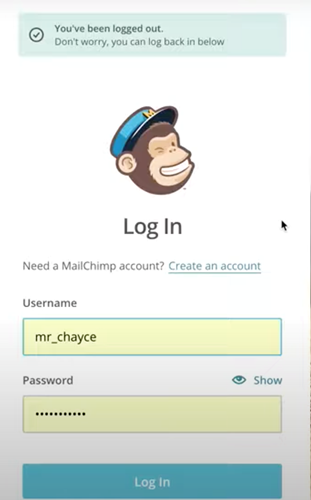

6. Go to your mailchimp account to get your API key.
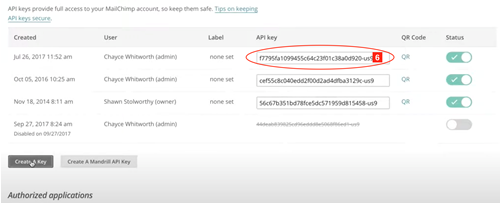
7.Click get list to get your list ID. This list is generated from your mailchimp account.
8. Click update mailchimp when done.
CHECK OUT THE CLIP BELOW- it walks you through the whole process showing how to get your API and Lists from Mailchimp, and where to put them in FARMpass.
You will need a Constant Contact account to use this feature.
1. Go to your Dashboard, click on Configuration,
2. Choose site settings.
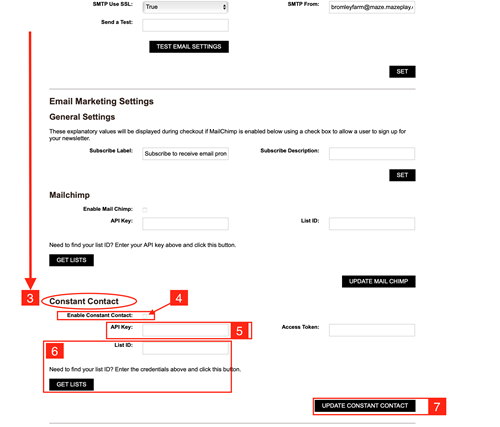
3. Scroll down to email marketing settings to constant contact section.
4. If you are going to use Constant Contact, click the enable Constant Contact box. It will put a small blue check.
5. Get the API key from your Constant Contact account.
6. Click lists to generate list ID's to use.
7. Click update Constant Contact when done.
1. Go to your Dashboard, click on Configuration.
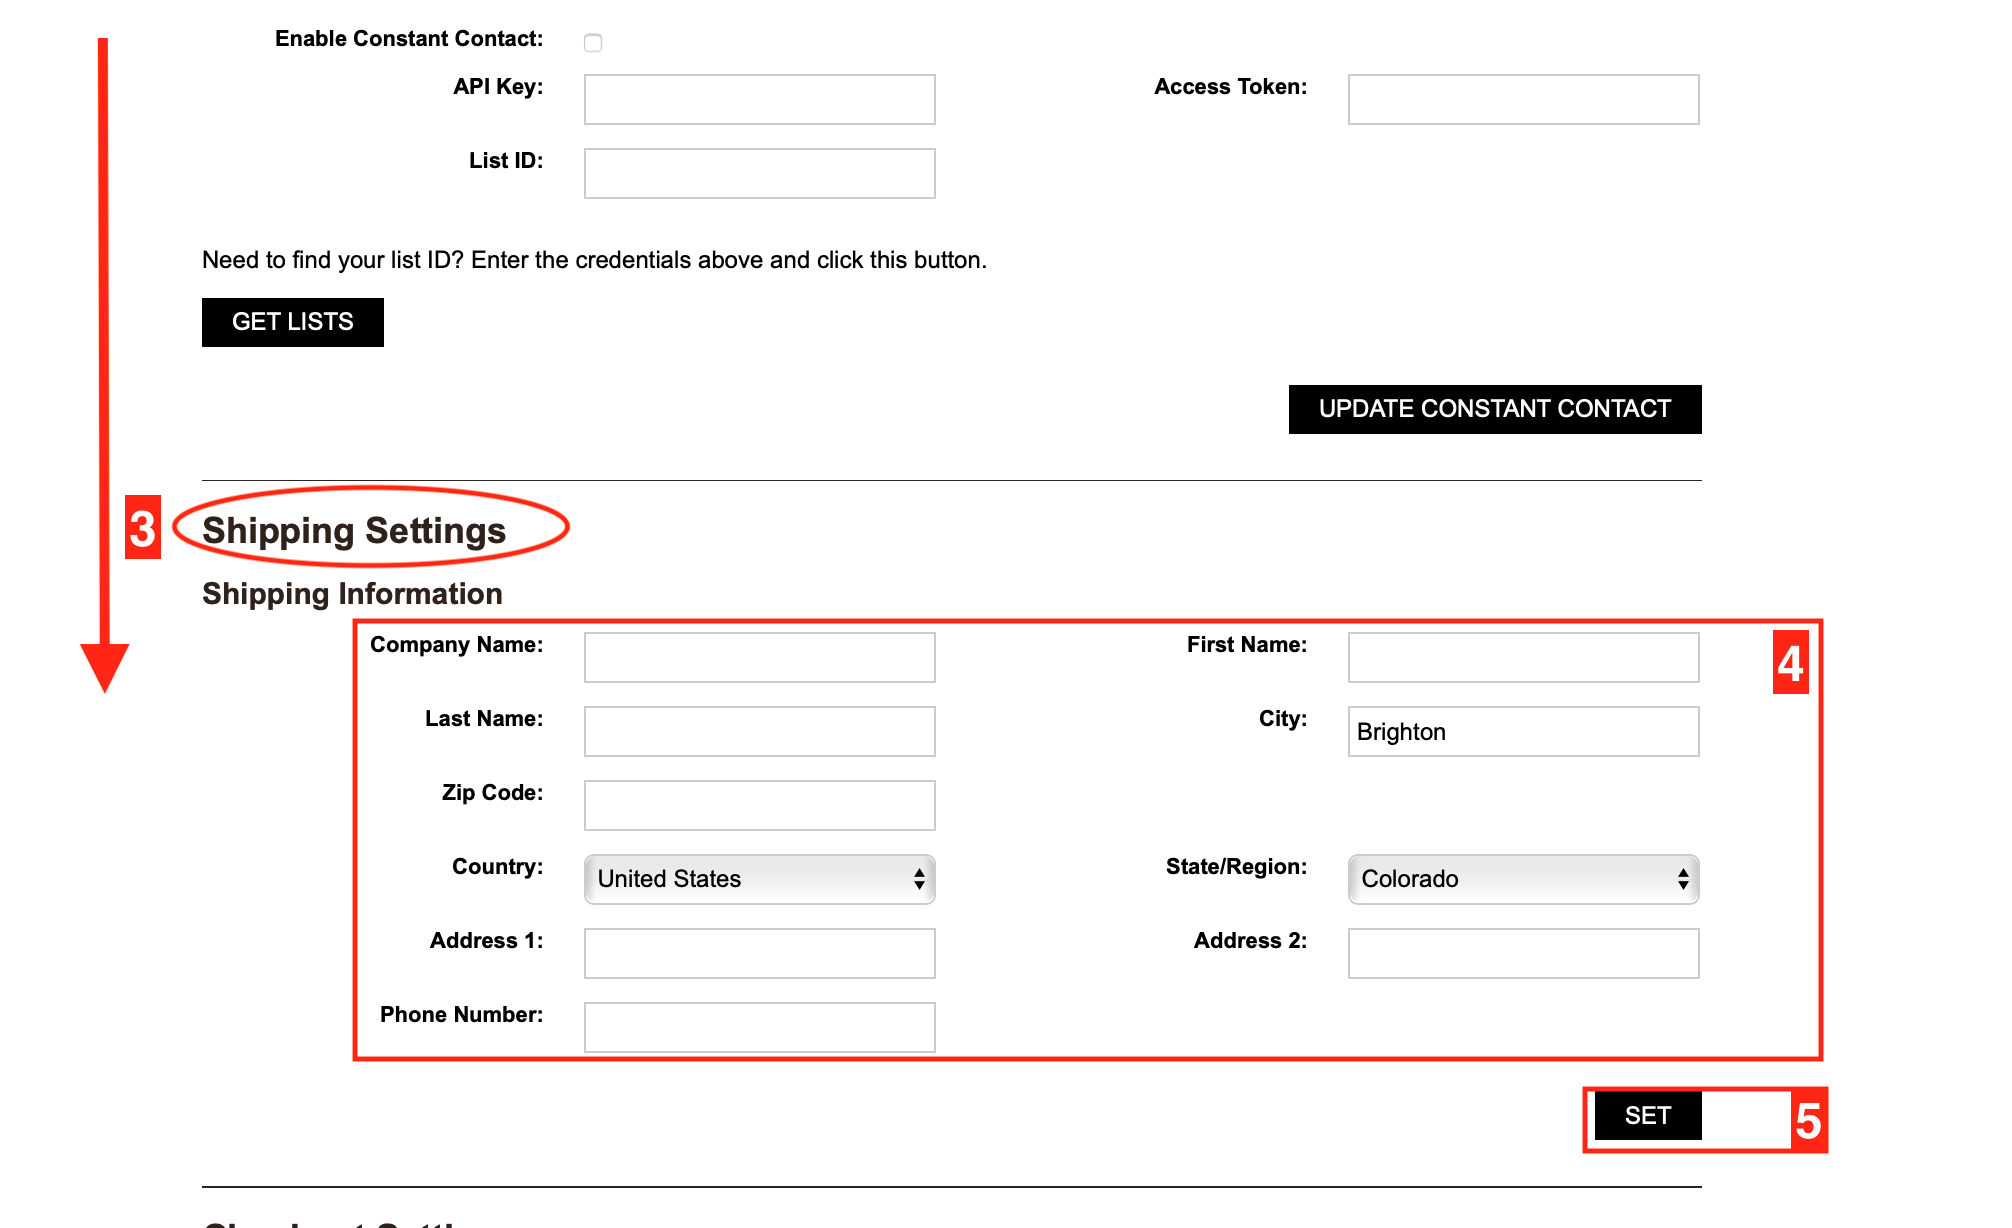
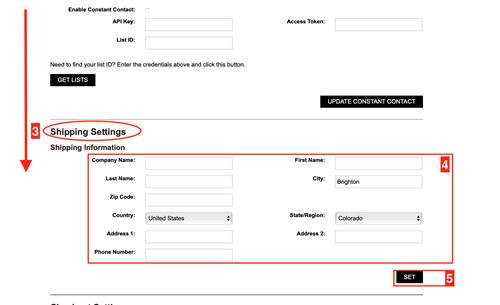
2. Choose site settings.
3. Scroll down to shipping settings.
4. Fill out or edit information.
5. Click set when done.
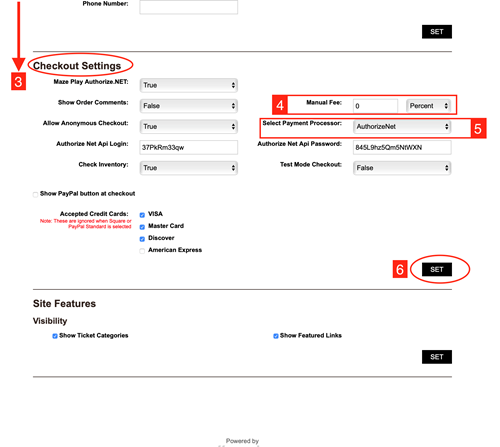
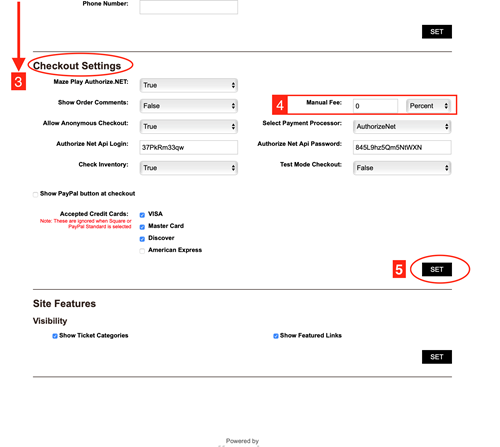
1. Go to your Dashboard, click configuration.
2. Choose site settings.
3. Scroll down to checkout settings.
4. Manual fee- fill this out if you want to charge a convince fee to add to each order. Pick flat or percentage and the amount you want to charge.
5. The payment processor- there are different options in the drop down box. What you choose with fill out and change the surrounding options. If you are choosing to use Square then follow the instructions that come up.
6. Click set when finished.
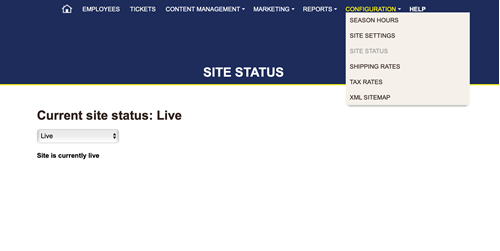
To Check the Status of Your Site
1. Go to your Dashboard, click site status.
2. Drop down box options: Live, Closed, Maintenance, Preview
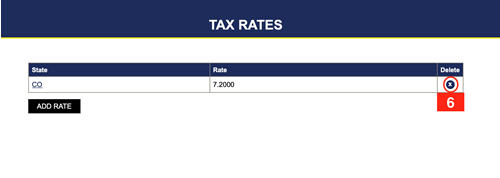
1. Go to your Dashboard, click Configuration.
2. Choose tax rates.
3. Click add rate.
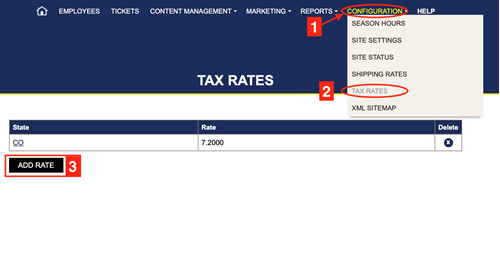
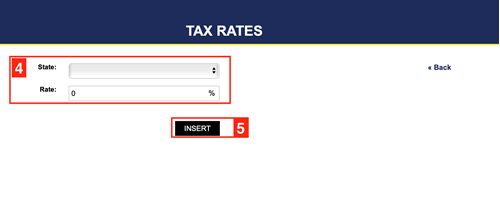
4. Choose your state and rate.
5. Click insert.
6. To delete a rate, click the x in the delete column.
A convenience fee is a charge that applies at the end of checkout. This is a set fee that charges per order.
1. Go to your Dashboard, click Configuration.
2. Choose site settings.
3. Scroll down to checkout settings.
4. Manual Fee- Choose flat or percentage. Fill in the amount to charge per order.
5. Click set when done.
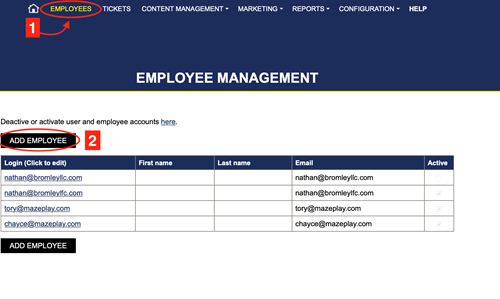
Employees
1. Go to your Dashboard , click employees.
2. Click add employee.
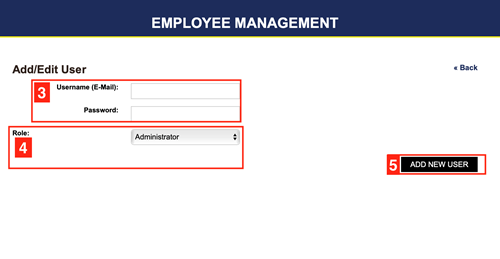
3. Enter the username and password.
4. Choose the role.
i. Employee- the account is limited, they have the ability to go into the logged in FarmPass website, and at the top right corner of the screen they will find Ticket Clerk. This is the only access they have. This is used for redeeming tickets. They can also sell tickets from that screen.
ii. Manager- can accomplish more than the employee account. The Manager accounts have the power to look up tickets.
iii. Admin- has full access to the website and all its ticket options. This should be used for a select few. NOTE- you cannot get to the ticket clerk screen logged in as an admin.
The Employee account is limited. They have the ability to go into the logged in FarmPass website, and at the top right corner of the screen they will find <Ticket Clerk>. This will take them to the ticket search, (which will be discussed in the Ticket Redemption section). From here the Employee/ Ticket Clerk may enter the customer’s information and redeem tickets (if the customer doesn’t already have it pulled up on their phone.)
The Manager account can accomplish more than the employee account. The Manager accounts have the power to look up tickets (as described in the previous paragraph) and un-redeem tickets. To UN-REDEEM TICKETS you go to <Reports>-<Ticket Status>, then enter the order number of the ticket (which can be found using the ticket search). Then click on <UnRedeem> on the right side of the boxes.
The Administrator account has the capability to change, create, or delete any part of Tickets (described in the two questions above) and everything in Dashboard. This account should only be available to a select few who are allowed access.
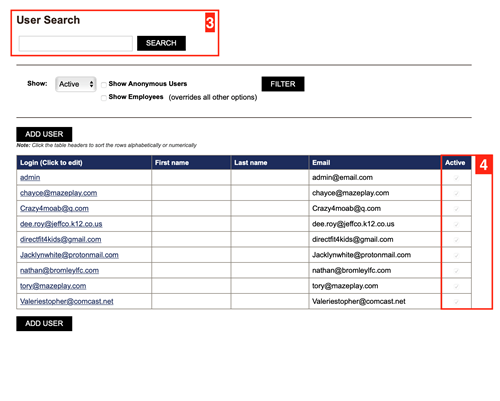
1. Go to your Dashboard, click on employees.
2. Click on the deactivate here link.
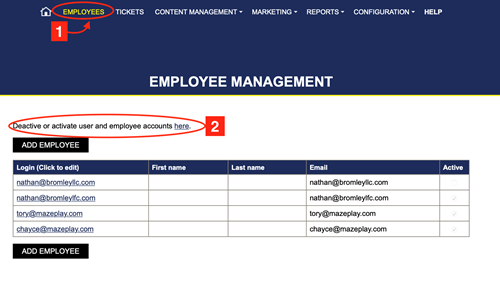
3. Search for users, looks up employees.
4. Check or uncheck the active box for the employee depending on whether you want to activate or deactivate the account.
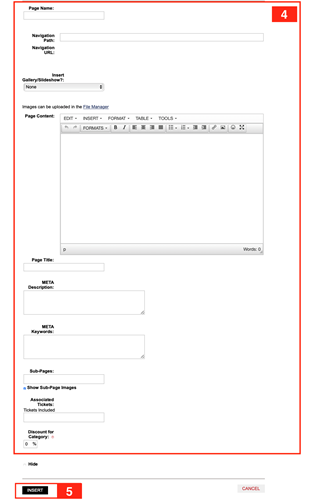
Content Management
1. Go to your Dashboard, click content management.
2. Choose pages.
3. Click create new page.
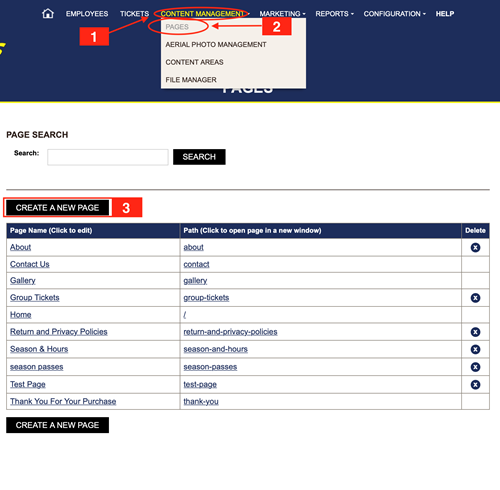
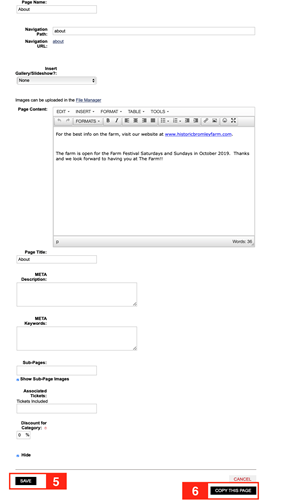
4. Fill out information.
5. Click insert when done.
1. Go to your Dashboard, click content management.
2. Choose pages.
3. To delete a page click the X in the delete column.
4. Click on the page to edit.

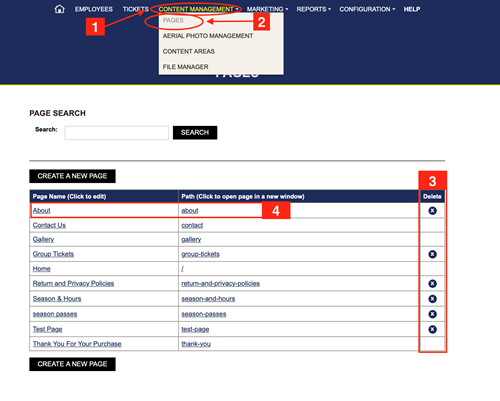
5. Make changes, click save.
6. Click copy this page if you want to make a copy to start another page.

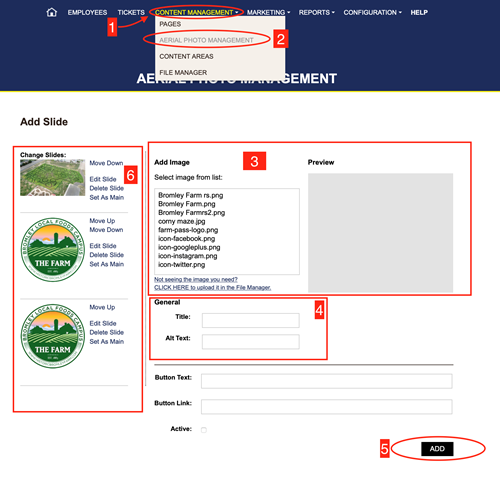
1. Go to your Dashboard and click content management.
2. Choose aerial photo management.
3. Load or choose a photo form the add image box.
4. Fill out the information for the image.
5. Click add.
6. You can edit, change order, or delete from the options on the left of the screen.
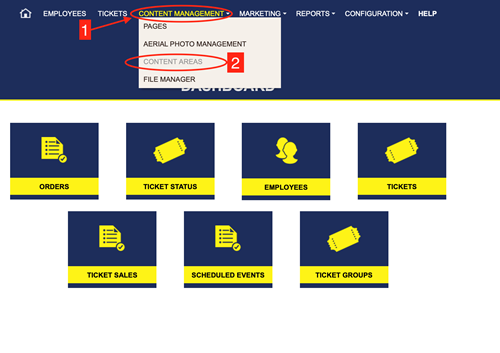
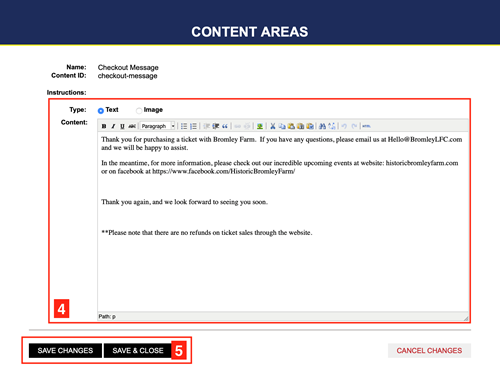
1. Go to your Dashboard, click content management.
2. Choose content areas.
3. Click select on checkout message.

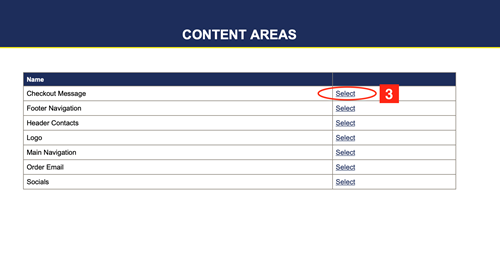
4. Fill out or edit the boxes.
5. Click save when done.
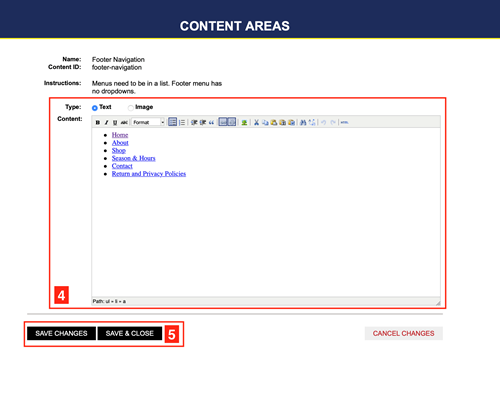
1. Go to your Dashboard, click content management.
2. Choose content areas.
3. Click select on footer navigation.

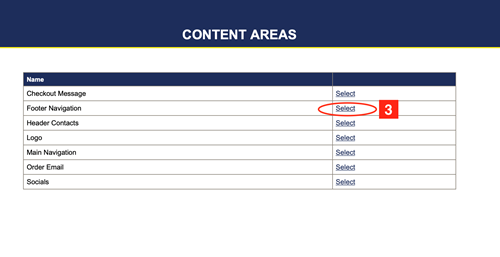
4. Fill out or edit information.
5. Click save when done.
1. Go to your Dashboard, click content management.
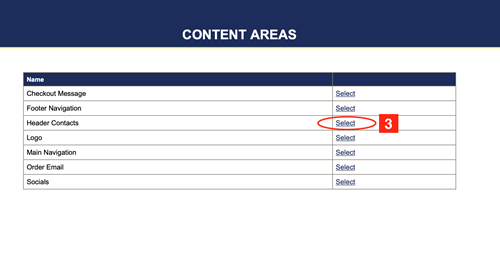
2. Choose content areas.
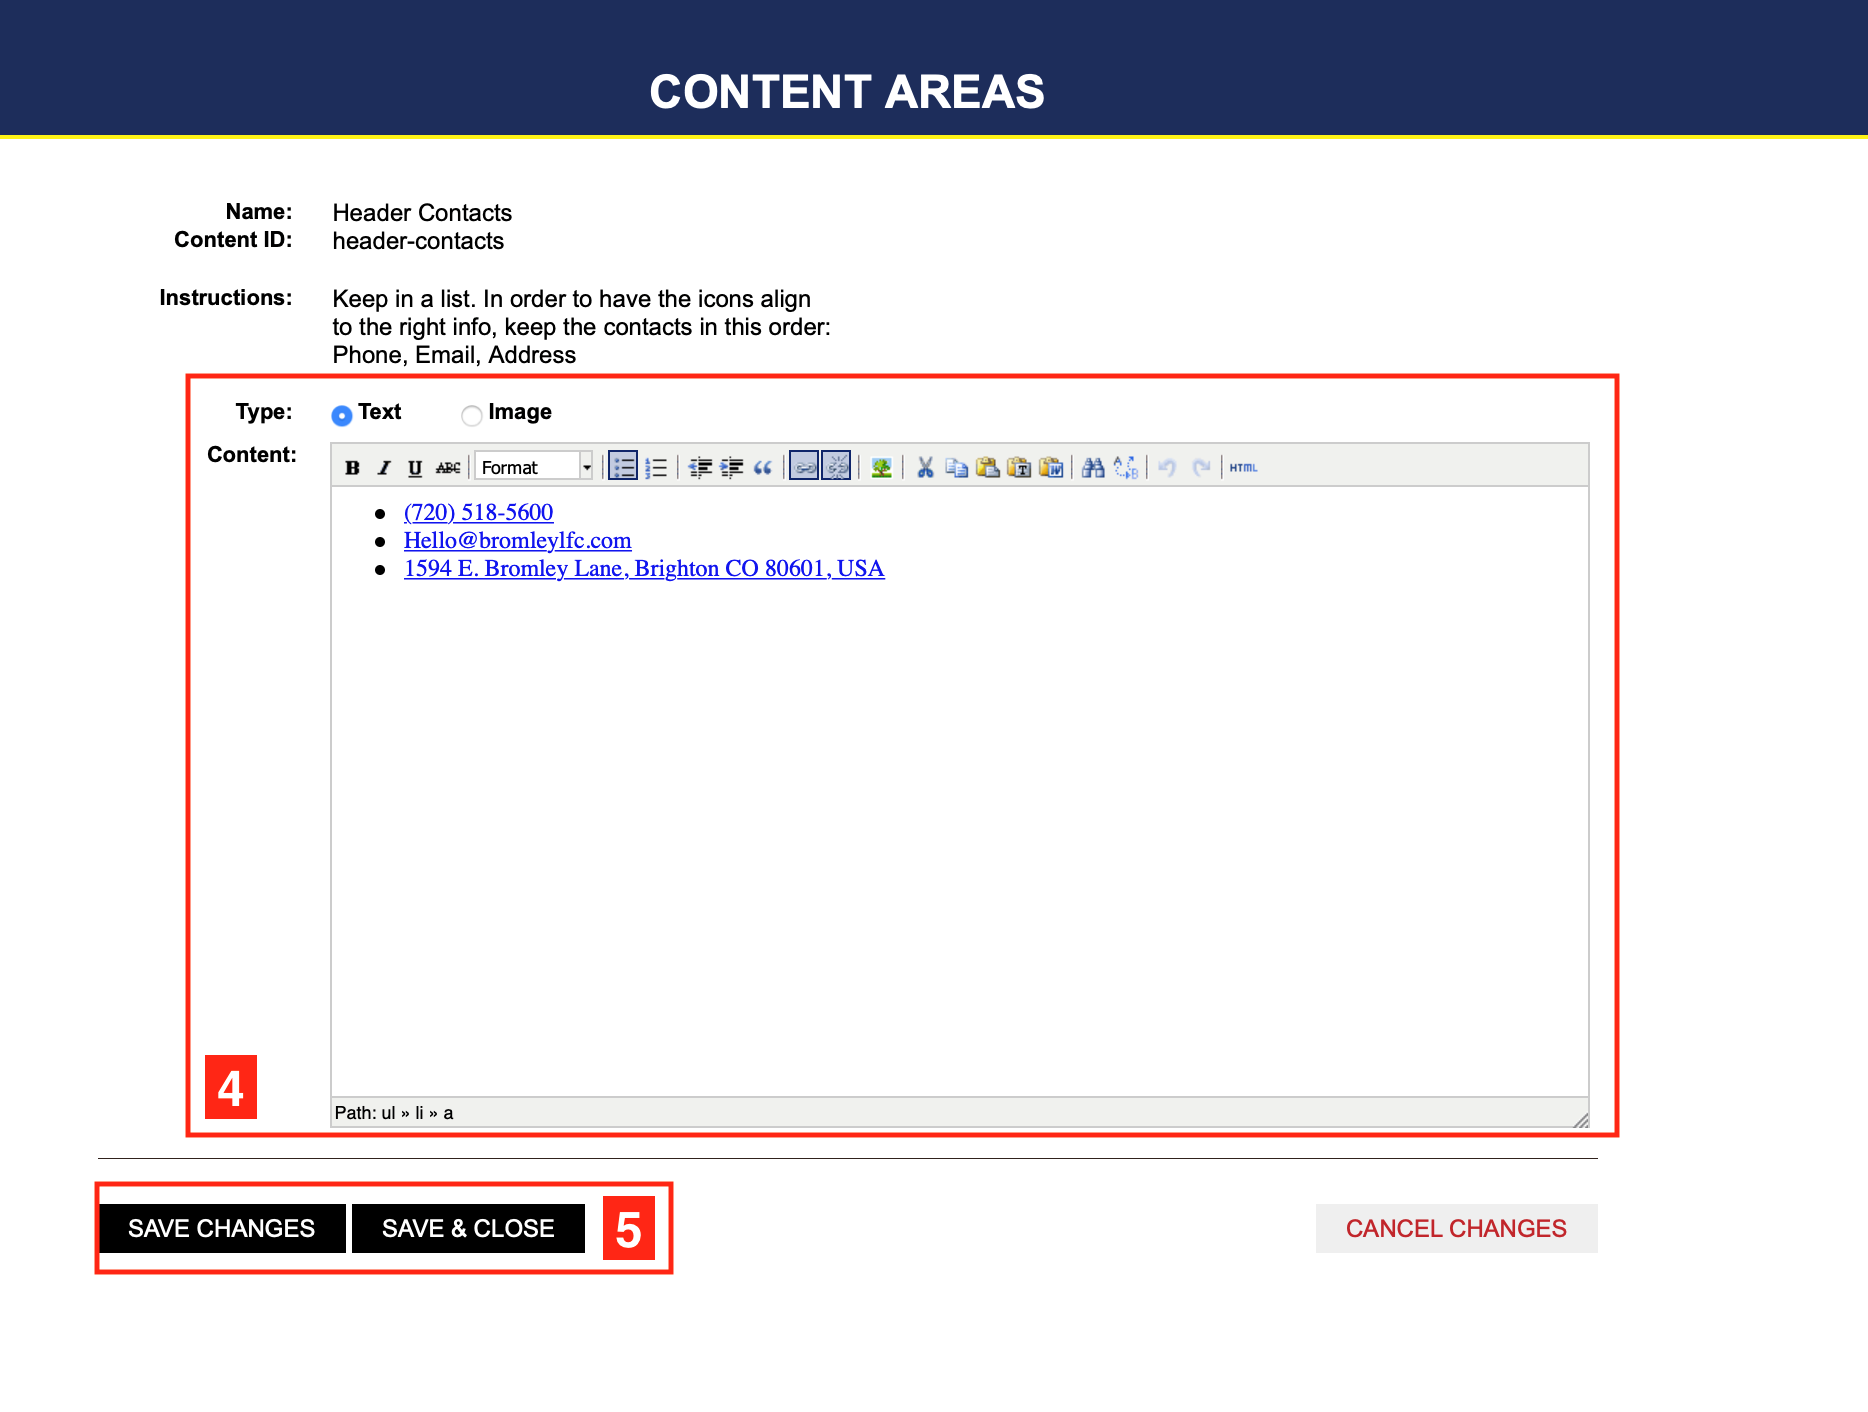
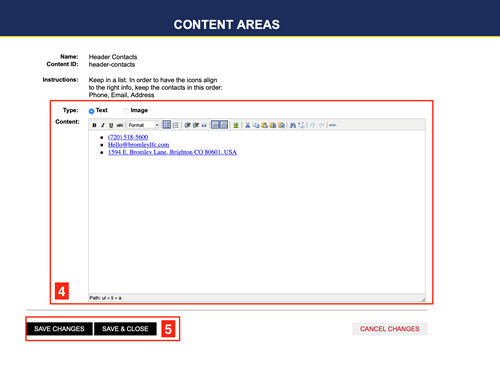
3. Click select on header contacts.

4. Fill out or edit information.
5. Click save when done.
1. Go to your Dashboard, click content management.
2. Choose content areas.
3. Click select on logo.
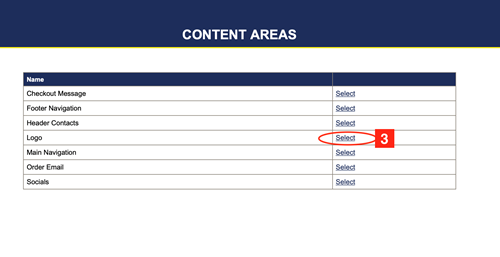
4. Fill out or edit.
5. Click save when done.
![]()
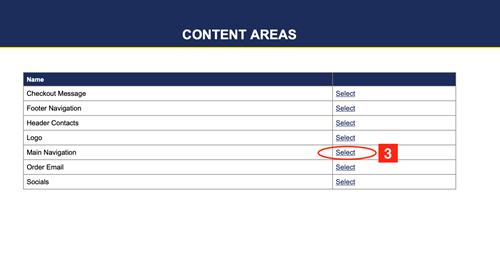
1. Go to your Dashboard, click content management.
2. Choose content areas.
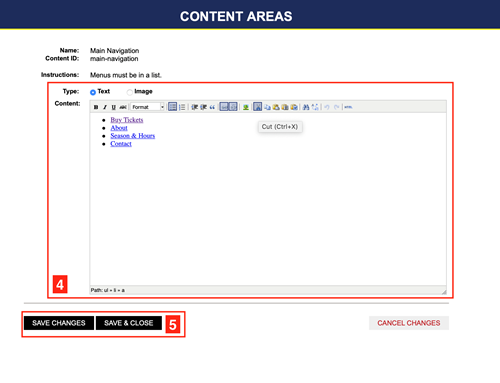
3. Click select on main navigation.
4. Edit or fill out.
5. Click save when done.
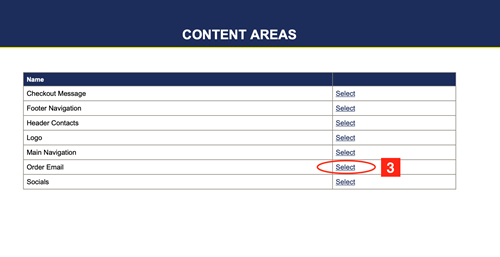
1. Go to your Dashboard, click content management.
2. Choose content areas.
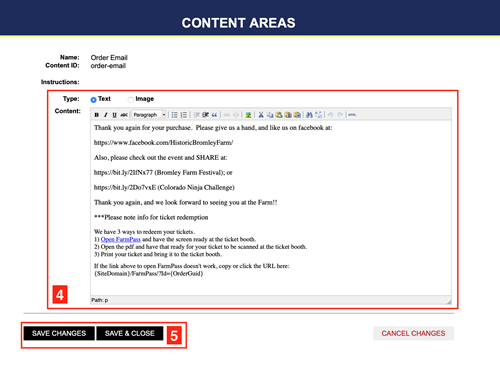
3. Click select on order email.
4. Fill out or edit.
5. Click save when done.
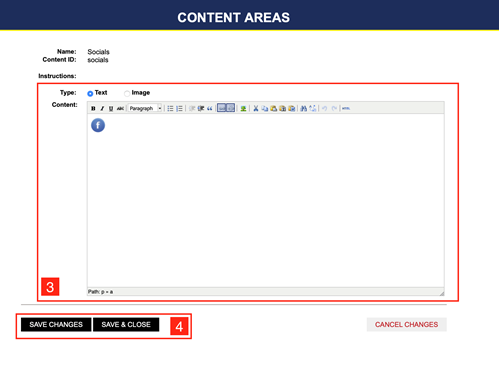
1. Go to your Dashboard, click content management.
2. Choose content areas.
3. Click select on social.
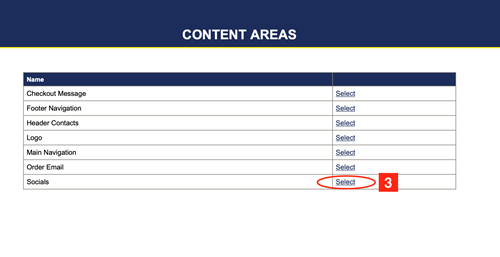
4. Fill out or edit.
5. Click save when done.
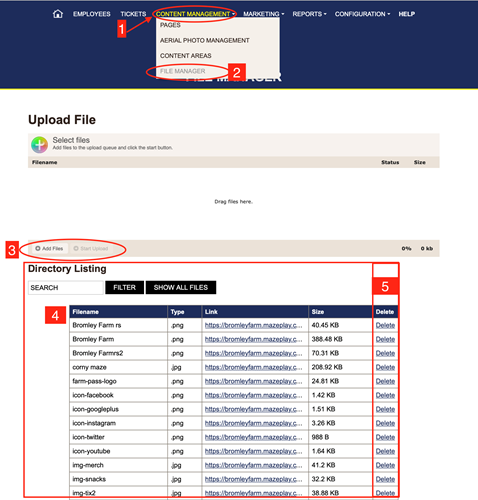
1. Go to your Dashboard, click content management.
2. Choose file manager.
3. Click add files.
4. Directory listing shows all the files already uploaded. To delete one click delete in the delete column in the row of the image you want to delete.